How the Coronavirus has Impacted my Life

7F376800-7264-40F7-8A7E-D7BD7E5537CC.jpeg

At the start of this year, I had stated that my goal for the year was simply to try to do what I could in my own small way every day to make the world a little better.  At the time, I implored everyone else to do the same.  I had no idea then that so many of us would be banding together to fight a pandemic, and it is even more surprising that for nearly all of us the way we can make the world a better place involves staying home and watching TV (Tiger King anyone?).  


I, like most of my fellow Americans, and a truly astonishing number of people around the world, am currently staying home as much as I can and following social distancing.  In a very real way, it feels like we are all in this together, and I feel a great deal of camaraderie with my fellow man as we are all coming together by staying apart.  I hope this shared experience continues to bring us together in the future.

I have noticed that a lot of people are sharing their experiences during this quarantine, and I thought I would throw my hat in the ring as well, not because my experience is particularly unique or special, but because it has been nice to see the commonalities between all of us.  It is easy to feel alone and isolated as we are all hunkered down in our own houses.  I hope someone whose experience is similar to mine will see this and feel that they are part of the greater community.

Social distancing started about a month ago for me, right around the time my kids were off for Spring Break.  We had started to see indications that there was a problem, but it seemed like an abstract threat until it wasn’t.  We canceled plans to visit my sister in New Orleans, stockpiled some food, and waited to hear what was next.  


My Most Recent Trip to the Grocery Store

My Most Recent Trip to the Grocery Store

At the time, as store shelves emptied and people started to panic I realized how fragile our modern lives really are.  Our store shelves are a couple of missed deliveries away from being empty, which means that most of us are at best a few weeks away from being hungry.  Most Americans are only a few hundred dollars away from financial ruin, and I doubt the situation is much better in the rest of the world.  If our systems stop working we will all be in a lot of trouble in a very short period of time.  It absolutely made me think about my life choices, and if I was really prepared.  Here in Florida, we have emergency situations pretty regularly due to hurricanes.  Almost all Floridians have hurricane preparedness kit that we restock every hurricane season just in case.  But those kits are made for short term inconveniences and a week or so of empty store shelves.  We know that the delay in supplies will be short term, and our lives will eventually get back to normal.  This situation is different.  It may be years before we get back to “normal” and there is a very real chance that things will never again be like they once were.

The situation was really brought home to me the first time we went grocery shopping after schools had been canceled and businesses had been shuttered.  I expected things to be different but hitting the grocery store felt a bit like walking into a dystopian future movie.  The store was more empty than I had ever seen it, people were being very careful to keep their distance, and all of the employees were armed with cleaning supplies.  The biggest difference though was the feeling that going grocery shopping was taking a risk.  

We made masks after that and have been giving them away to health care workers and people in high-risk groups.  We also made some for ourselves which have since come in handy.

I have been pretty lucky throughout this situation.  I remain employed, and I have been able to work from home.  I also live in a medium-sized city that has not been hit hard by the virus, probably because most of the people that live here seem to be taking social distancing seriously.  I am also lucky to live in an amazingly friendly neighborhood that has pulled together in a really amazing way to support each other throughout this pandemic.  One of our neighbors has started to engage everyone with dinner ideas every night.  We have also had a social distancing neighborhood block party (people ate outside in their own yards within sight of each other but significantly more than 6 feet away from each other), and there are currently plans to hold a graduation parade for the neighborhood seniors whose graduations have been canceled (a graduate per car with neighbors showing their support by waving and yelling from their front doors).

Infection is not expected to peak in my town until June, so, despite the current talk of reopening the country I expect the kids and I to be home for at least another month, probably two, and it is very possible it will be longer unless testing and contact tracing become far more widespread.  We are trying to make the best of it.  We are ALL trying to make the best of it.

Please consider sharing your own experience in the comments, and connect with a fellow human being in a way that is still safe.

Happy Valentine's Day!

heart-700141_1920.jpg

Emily Heller is a pretty funny comedian.  She tells a lot of jokes about relationships and being single.  My favorite quote of her’s is, “I’ve been single for a while and I have to say its going very well.  Like… its working out.  I think I’m the one.”  It has become a meme because it is hilarious, but it is also a really good way to think about being single.

Valentine’s Day is hard for singles, even singles that are generally happy with their single status.  There is a cultural assumption that people are more happy paired, even though that is often not the case, especially for women (https://www.theguardian.com/lifeandstyle/2019/may/25/women-happier-without-children-or-a-spouse-happiness-expert).  As a result, singles are often focused on finding a good partner, and days like Valentine’s day serve as a reminder that a quality relationship remains elusive.

There is however a very important relationship that singles are in a great position to focus on - the relationship that we all have with ourselves.  People will come and go from our lives, kids grow up and leave home, partners may leave or pass, but we will always be there for ourselves.  It is important to make sure that we are in a loving and supportive relationship with ourselves.

We build good relationships with ourselves by taking care of ourselves, both mentally and physically.  We give ourselves opportunities to grow, and succeed.  We do things we love.  We seek help from outside sources when we need it.  We give ourselves praise when we deserve it, and learn from our mistakes instead of beating ourselves up over them.  We become the version of ourselves that feels good and right, and that we can be proud of.

For those of us that want to be paired, being awesome and feeling self confident is very attractive as well.  Taking good care of your self may help you find your perfect partner, and even if it doesn’t, you still become a happier more fulfilled version of you with a wonderful single life.

For those of you that have already found a wonderful partner, taking care of yourself is still important.  You cannot give to your relationship if you have nothing left to give.  As we are reminded on planes put your own oxygen mask on before you assist someone else.  You cannot care for others unless you care for yourself.  

To all of my readers, Happy Valentine’s Day!  I encourage you to treat yourself well today, and I hope that you are the best Valentine’s Day date you have ever had. 

The Happiness Project

The Happiness Project.jpg

For several years now Gerwerken Crafts has been about making things.  I have knitted and sewed and made my house a home.  I enjoy making things.  I like the feeling I get at the end of a project - the sense of accomplishment is a powerful motivator.  However, for more than two years, I have not made much that you can easily see or hold.

A craft is the application of skill or expertise in the creation of something that one desires. I have realized that the things that I truly desire are not objects that I can create. What I truly desire is daily happiness and a life I can look back on with contentment.

Over the past two and a half years, I have researched and experimented with methods for obtaining happiness. I have simplified and culled that which no longer served my purpose, and I have added things that contribute toward my peace. I have been learning a new craft and I have made a tremendous amount of progress toward becoming the happiest and best version of myself that I can possibly be. I still have a lot of work to do.  I will always have work to do because happiness is something that you have to work toward every day, and becoming better has only shown me how much further I have to go.

I plan to spend the rest of my life perusing happiness and becoming a better version of myself.  One of the ways I plan to do that is by sharing what I have learned with all of you because I believe that happiness breeds happiness and that part of becoming better is helping others to the best of our abilities.

To that end Gerwerken Crafts and the Hang Your Hat podcast will be changing focus a bit in the next year.  I will still be sharing the tangible things I create, but I will also be sharing the things that I do, and the things that I have learned that have made my life and myself better.  The focus of the blog will change from crafting things to learning to craft the best possible version of our lives.  I am calling this conversion the Happiness Project, and I am hoping that all of you will join me in it, and share what makes you happy so that we can all learn from each other and support each other’s journey.

My New Year's Resolution

Goodbye, 2010’s.  Goodbye to a decade that was in my personal life, frankly a little rough.  Goodbye to the old, I am ready for something new.  I am ready for the 2020s.

I was struck recently by the realization that the 1920s started 100 years ago.  Unlike the 1900s or 1910s, the 1920s feel like the modern era to me.  Women in the 20s wore short hair, and short skirts, and pants.  Cars were a regular part of the landscape, and swing dancing (one of my favorite things to do) became a thing.  There were even commercial fixed-wing flights regularly scheduled in the 1920’s - 100 years ago.  It seems surreal that such a thoroughly modern decade was so long ago.

The 1920s was a decade that was remarkable for its optimism.  The Great War had just ended, socially progress was being made, and financially the world was doing very well.  It seemed likes the good times would never end, and yet they were on the brink of an economic and ecological disaster (the great depression and the dust bowl) which would be shortly followed by extremist nationalism that would fuel genocide and the worst war the world has ever seen.

We are at a crossroads now.  While the world is doing okay now, we are on the brink. Extremist nationalism is on the rise and there are signs of economic and ecological disaster on the horizon. The 2020s is a decade in which we could turn things around.  If we pull our heads out of the sand and begin working on real positive change we could start a new golden age, a new modern era that we could all be proud to be a part of.  If we ignore the warning signs, fail to learn from our past mistakes and do nothing, then we will be doomed to repeat ourselves.  

Now is the time to make a change in our own lives and the world around us.  That is why my New Year’s Resolution this year is to try.  I plan to simply show up every day and do what I can to reach my goals, and make the world a better place in my own small way.  If we all simply tried we could change the world.

Does your debt make you undateable?

Debt Undateable.jpg

As I was researching the pros and cons of debt repayment strategies I came across an interesting article about how debt can actually be negatively impacting your love life. Here is the article from Finder https://www.finder.com/unacceptable-partner-debt. The gist of the article is that people are less likely to date those with high debt. What is considered high depends on the type of debt; however, the amount of debt that will start to negatively impact your dating life is may be a lot lower than you would expect.

72% of people that were surveyed for the article said that they would, “reconsider a romantic relationship because of debt. That means that if you have a lot of debt then nearly 3 out of 4 potential romantic partners may not want to date you because of it.

Credit Card Debt

Credit card debt was considered the least desirable type of debt among the survey respondents. Only $12,615.96 of credit card debt made a persson undateable. That is about twice the average household credit card debt in the US right now.
Student Loans

Surprisingly student loans were the second most undesirable type of debt, with debt over $48,761.15 considered unattractive. Current graduates carry about $37,000 in student loans on average when they graduate, which isn’t that far below the undateable debt load.

To find out if your debt makes you undateable check out the finder article for the full results.

Sources:

  • https://www.finder.com/unacceptable-partner-debt

  • https://www.nerdwallet.com/blog/average-credit-card-debt-household/

  • https://www.cnbc.com/2018/02/15/heres-how-much-the-average-student-loan-borrower-owes-when-they-graduate.html

Getting out of Debt:  Avalanche vs Snowball

gettingoutofdebt.jpg

As of 2018 the average US household that has any type of debt had on average $135,768 in debt.  The average household that has revolving credit card debt has $6,929 in revolving credit credit card debt, and those with student loans owe an average of $47,671 in student loan debt.  

The age group that has the most personal debt is older millennials, age 25 to 34 in 2018.  They had an average of $42,000 in personal debt in 2018.  However, the group with the highest amount of overall debt were 45-54 year olds with $134,600 in debt, followed closely behind by Gen Xers (35-44 years old) with $133,100 in debt.  

In addition, 2 in 10 Americans spend 50% to 100% of their monthly income on debt repayment, and only 23% of Americans said they had no debt.

Chances are you have debt, and a LOT of it, or at least more that you can comfortably afford to pay off every month, but there is hope if you want to get out of debt.

Over the past year I have gotten control of my debt and started paying it down aggressively.  If I keep going at my current rate I should be debt free, with the exception of my mortgage, next year.  Had I not started paying it off at my current rate it would have taken me 7 years to pay it off, assuming I didn’t spend any more.

How am I doing it?  I created a budget, got control of my spending, and I sink as much as possible every month into paying off my debt using the debt snowball method.

Avalanche vs Snowball

There are two schools of thought on debt repayment;

  1. The debt avalanche, or

  2. The debt snowball method.


In the debt avalanche method you pay off the most expensive, or highest interest rate debt first, then work down toward the cheapest, or lowest interest rate debt.

In the debt snowball method you pay off the smallest debt first, then use the money that was paid toward the smallest debt toward the next smallest.  Rinse and repeat until you are paying off the largest debt with the total you were paying for all of the previous debts.

Both methods have have good and bad aspects, so there is no right way for everyone, but I like the debt snowball because it helps with motivation.  Since you are paying off the smallest debt first it takes relatively little time to pay it off and you get a quick win.  I feel like the sense of accomplishment that comes from paying off a debt gives me motivation to keep working on it, and the eventual final pay off doesn’t seem that far away.

Using the avalanche method you don’t necessarily get the quick win unless your highest interest debt is the also the smallest amount.  As a result it can feel like it is taking a long time to make any progress, which is saps motivation.  However, the avalanche method typically has a faster total payoff time than the snowball method and less is paid in interest than the snowball method (as long as you continue to sink the maximum amount of money available into the debt payoff).

I actually think a combined approach is best whenever possible.  I like to use the snowball method as my overall approach because it’s quick wins increases my motivation, but combine it with the avalanche approach for debts of similar size to decrease my total pay off time and interest paid.  If, for example, you have three credit card debts, one is $1000 and 20% interest, one is $2000 and 20% interest, and one is $2100 and 25% interest, I would pay off the $1000 bill first for the quick win, then pay off the $2100 bill because the $2000 bill and $2100 bill are similar size but the $2100 bill has a MUCH higher interest rate.

The bottom line is that you should use the method that is actually going to work for you, keep you motivated, and eliminate your debt.

Whichever method you use, be sure to track your progress.  My bank has an awesome goal tracker that shows me how much progress I have made, how much more I have to go, and if I am on track to meet my goal in the time I specified.  It really keeps me motivated to continue paying off my debt as quickly as possible.  I get a nice happy feeling every time I check my progress and see how far I have come.  Mint.com has a very similar goal tracker that is free to use, which is ideal if your bank doesn’t offer a similar option.

Make a Budget

If you want to start paying off your debt but you don’t know where the money would come from then you need a budget.  This month’s episode of Hang Your Hat delves into several budgeting philosophies to help you find the one that works the best for you.  I also discuss money saving tips including some radical options you may not have considered yet.  You can listen to Episode 32, Household Budgets here, or wherever you get your podcasts (just search for Hang Your Hat).


I would love to hear your stories about your own debt pay off.  Please share them in the comments.

Sources:  

Balance

Balance.jpg

It is the first day of fall here in the Northern Hemisphere, the Autumnal Equinox.  It is widely believed that the Autumnal Equinox is one of two days during the year where day and night are equally balanced.  While that is not strictly speaking true (listen to HYH episode 19 for details), it still serves as a wonderful bit of symbolism.  What better time of year for self reflection? All to often our lives are out of balance and we suffer for it, sometimes without even realizing it.

I started this I year in a bit of a tailspin.  My husband of nearly 14 years told me before the start of the new year that he wanted a divorce. I found, heading into the new year, that my life was terribly out of balance. I was stressed, out of shape, and over worked. I hadn’t been taking care of myself. However, the divorce, as awful as it was, forced me to reassess my life, figure out what was important to me, reestablish my goals, and realign my behavior so that I could meet my goals.

It started with something simple. I was feeling overwhelmed, and I needed a sense of accomplishment, so I set a goal that I knew I could keep. I committed to doing just one push up a day, and I did one push up a day. Or, I started with one push up a day. Once I got moving I gained momentum and I did more.

I started doing yoga, and felt my stress slipping away. I stretched along with Adrienne from Yoga with Adrienne every morning before work. I took up biking after a hiatus that had been far too long, and I rediscovered an old love - ballroom dancing. I also cleared the clutter in my house, and along with it much of the clutter in my mind. I became more me.

I started out simply trying to take better care of myself, and gain a little balance in my life. While I still have a very long way to go before I have met my goals, I am already far healthier, happier, and less stressed than I have been in years.

Good can come out of the worst of situations. Today is the perfect opportunity to reflect on our lives, start taking care of ourselves, and begin the journey that ends with each of us being the best version of ourselves.

I would like to take this opportunity to thank my readers and listeners for your continuing support. During this trying year it meant the world to me.

Snow Day

snow_man.JPG

Where I live in North Florida snow is not unheard of, but it is pretty rare.  Snow that actually stays frozen long enough to play with is even rarer - maybe a once in 5 to 10 years kind of event.  Today was one of those special days.  When we woke up this morning we had a light dusting of snow all over the yard.  It felt pretty magical.

3in_snow_man

Since we have absolutely no infrastructure in place to actually deal with snow or ice on the road, and no one has any idea how to drive safely on snow or ice, everything was shut down including the kid's school and my work, and we had a snow day.

icy_bird_bath

The boy loved playing with the snow where it had clumped together and gathered enough to make a 3-inch tall man.  It was the biggest and only snowman we have ever made here in Florida.

snowball

The girl was not quite as keen on the snow as her brother, but she did keep from freezing long enough to make a very respectable snowball.

snowy_aloe

Once we had all been thoroughly frozen we headed inside to enjoy some s'mores by the fire.

fireplace

For all of you who are having a much snowier snow day than us, stay warm.

~Amy


2018 is the year of the Mini Habit

(Note:  This post contains affiliate links.  That means that if you buy a product through one of these links I will receive a little bit of money in return, at no extra cost to you.  However, I was not paid to advertise any of the products featured here, and all opinions are my own).

The start of the new year is a great time to turn over a new leaf and push on to bigger and better things, as a result, many people start the year off with a New Year's Resolution.  The problem is that New Year's resolutions have an abysmal success rate.  By the end of January, most people have already given up on their resolution.  We have these huge goals and start off the year with lots of motivation and hit them hard, doing things like going to the gym 2 hours a day every day.  That kind of motivation is hard to keep up though, especially if you don't see the kind of results you would like immediately.  Before long you are discouraged, skip a day, then two days, feel like a failure, and give up.

What if instead, you had a teeny tiny behavior that you had to do every day that supported your bigger overall goal, one that required you to do so little that you could do it easily every day, without fail?  Then every day you would make incremental progress toward your bigger goal, and since you were meeting your daily requirements every day you would feel like a success.  You would be encouraged rather than discouraged, and you would keep at it, right?

For a while now, I have been trying to figure out ways to create daily habits that would support my overall goals - getting fitter, writing for the blog more often, and doing research for the podcast every day.  I have tried Habit Stacking, and habits based on a cue, and habits based on a time of day, one habit at a time, multiple habits at one time, and every other derivation you can probably think of.  I always failed.  I didn't have enough motivation, or enough time, or enough energy.  Life consistently got in the way of hour-long workout sessions, and marathon research.  I tried to make myself do too much, and I just couldn't keep up - at least not with enough consistency to actually form a habit.

Then, after what seemed like ages of searching I found Mini Habits, by Stephen Guise.  The idea behind Mini Habits is that the thing you are striving to do every day is so minimal an obligation, so simple, and so easy that you could still do it on your very worst day.  That way you never fail, you stay encouraged, and keep working toward your goal.  You can always do more than what your mini habit requires, but you never HAVE to.  Even if you only do the minimum you have still succeeded, and if you exceed the minimum, well that feels even better.

So how small are mini habits?  As the author of the book likes to put it, stupid small.  Currently, the mini habits I am working on are;

  1. Preform one push-up or sit-up per day  
  2. Write 50 words per day
  3. Read the equivalent of one page in a book per day

I can complete all 3 of these in 5 minutes or less and I have every day since I started Mini Habits.  I have also exceeded my minimum in most areas on most days so far.  The thing that makes this so much easier than all of the other habit programs I have tried is that I have to do so little that I can always do it.  I don't have to get up the motivation to do one push-up, it is so easy that I just do it.  And usually, once I am down there doing the push-up, it is easy to do a couple more, and maybe a few stretches, and then why don't I turn on that yoga routine that looked pretty good - after all, I don't have to finish it since I have already met my goal for the day.  In the same vein one page usually turns into 10 or even 20, and 50 words (which is not much more than a tweet) often turns into 200 or more.  Once I start it is easy to keep going, but if I knew beforehand I HAD to sit down to write 200 words or read 20 pages I would never start, it would just take more motivation than I could generally muster on a daily basis.  I have a full-time job outside the blog and podcast, 2 kids, and a list of things that need to be done at home longer than my arm - doing more just seemed like too much, that is until the requirement became so small that it seemed easy.  Now, I may not be making leaps and bounds toward my goals, but I am making steady progress, and that feels really great.

If you are looking for a way to reach your goals in 2018 and have had trouble sticking with it in the past, I would like to encourage you to give Mini Habits a try.  The worst that can happen is that you spend a few bucks and discover it isnt for you, the best that can happen is that you finally meet your goals and live your dream.  For me, that is a risk worth taking.


3 Inexpensive Comfy Chairs for your Reading Nook

October is National Book Month and a great time of the year to start thinking about where you will curl up to read during the long winter months.  On Episode 21 of Hang Your Hat I discussed the ergonomics of reading chairs and what to look for when picking the perfect chair for your reading nook.  Today I am sharing 3 comfy, pretty, and inexpensive reading chairs that might just be the chair you need.

WM chair.jpg

Fuchsia Nina Chair from World Market

At $329.99 this is the most expensive of the 3 chairs, but it is also the prettiest.  The velvet upholstery and turned legs with casters give it a traditional look, but the Fuchsia color makes it modern.  I have sat in this chair at my local World Market and I found it firm but comfortable, and very luxurious feeling.  I do have some concerns about the chair's durability, however - those castors look pretty delicate.

Amazon Chair.jpg

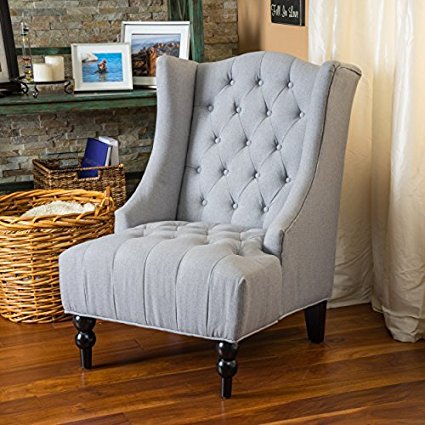
Clarice Tall Wing Backed Chair sold by Great Deal Furniture on Amazon

The Clarice chair is the cheapest of our 3 chairs at only $199.99 with free shipping.  It also comes in multiple color combinations (some of which are even cheaper) to fit several home decor color schemes.  The overall appearance of the Clarice chair is quite traditional, but the style lines of the wing back armrest combo keep the chair from looking too old school.  I will admit I am a little suspect of a chair that costs so little, but it has 4.5 stars on Amazon with over 100 reviews, and the written reviews are pretty positive, so I think it is worth considering, especially if your budget is pretty tight.  

strandmon-wing-chair-yellow__0325450_PE517970_S4.jpg

The Strandmon Winged Chair from Ikea

The Strandmon winged chair is the chair on the list that I plan to make a part of my own reading nook.  At $229 dollars it is very reasonably priced, comes in lots of colors, has pretty good reviews, and a 10-year warranty.  I have also sat in this chair at Ikea and I found it very comfortable.  This chair is a little on the small size.  I am 5'4" and I felt like it was made to fit me, however, my husband, who is 6'4", thought it was reasonably comfortable as well.


If you have a favorite reading chair you would like to share, please let me know about it in the comments!

Great Books to Curl Up with this Fall

On Episode 21 of  Hang Your Hat I discussed some of the science behind creating a reading nook that will perfectly suit you, the reader, as well as some unscientific accessories that will serious seriously amp up the cosy factor.  You should totally check it out.

But no reading nook is complete without some great books.  Here are a few of my current favorites (not necessarily my all-time favorites, but the ones I am enjoying right now).

bob.png

The Bobiverse Book Series

Currently, this is my favorite new book series.  I absolutely LOVE it!  Bob is a self-replicating space probe (a Von Neumann probe if you want to be technical about it), that is on a mission to explore space and save humanity.  Throughout it all, he maintains a great sense of humor and a sense of wonder.  He is the kind of space probe that I could become friends with, and I have grown attached to him and his many copies while reading the 3 books in the series that have been published so far.

dresden.png

The Dresden Files Series

The Dresden Files is an Urban Fantasy series featuring Harry Dresden, a wizard detective.  Jim Butcher, the author of this series is a New York Times best-selling author and it is easy to see why in this series.  He is able to seamlessly meld irreverent humor and fun with issues of life and death, love, family dysfunction, and faith.  I actually prefer the audiobook version of this series as read by James Marsters (you might remember his as Spike on Buffy the Vampire Slayer), to the physical book.  Marsters completely embodies the character of Dresden, which makes this series an engrossing listen.

anansi.jpg

Anansi Boys

If you have not already made yourself acquainted with the work of Neil Gaiman, you should.  It will give you a completely new perspective on the world around you, and leave you wondering what you would find if you were able to scratch the surface of reality.  Anansi Boys can be thought of as a companion book to American Gods, as it was written along the same theme.  The Anansi Boys are the sons of the trickster god Anansi, and the book explores their life, origin, and family dynamics.  

sherlock.jpg

Sherlock Holmes as read by Stephen Fry

I love Sherlock Holmes.  I have multiple versions of the complete collection, and I enjoy them all, but this version read by Stephen Fry is my new favorite.  His reading draws me into the story in a way that I have never experienced before.  It is like I am there standing next to Holmes in his rooms at Baker Street watching him solve the mystery.  

strike.png

The Cormoran Strike series is about a disabled vet who works as a detective, his assistant Robin, and their outrageous cases.  Don't be fooled by the author's name, Robert Galbraith is a pseudonym for J.K. Rowling, the author of the Harry Potter series, and while the Strike series isn's even in the same genre as Harry Potter her creativity, attention to detail and wide knowledge base still shines through like it did in Harry Potter.  In case you were thinking this is a good series to give to the kids after they finish Harry Potter, fair warning - this is NOT a kid's series.  This one is also being picked up as a TV series as well, so stay tuned.  I only hope it is as good as the books.


If you have a recommendation for a good book everyone should make time to read this fall, please let me know about it in the comments.  I am always on the hunt for new books, and I am sure other readers would appreciate the recommendation too.

58 Songs for the Ultimate Halloween Playlist

halloween playlist.jpg

Happy Friday the 13th, in October no less!  Halloween is just around the corner, and what better way to celebrate than with a Halloween playlist that sets the scene.  

Today I am sharing my Halloween playlist.  I have been putting this one together for a while now, and there are a few new additions this year that I hope you enjoy.

If I have left off your favorite Halloween song, let me know about it.  I am always on the lookout for great new additions.

Is microwaving vinegar and water a miracle microwave cleaner?

While I was researching for Hang Your Hat's Episode 8:  Wax On, Wax Off, one cleaning hack came up over and over again - Cleaning your Microwave by Microwaving Water and Vinegar.  Some sites implied that once you did the microwaving you were done and the microwave would be magically cleaned by the water and vinegar vapor, others indicated that a quick wipe down of the walls after microwaving the water and vinegar mix was required but, it would be so easy to remove the junk that it would practically jump off the side of the microwave onto your cleaning rag.

I was pretty skeptical of these claims.  It just didn't seem likely that just microwaving water and vinegar would make that much difference, so I decided to do an experiment of my own.

Before

Before Cleaning - Spaghetti Explosion Mess

Before Cleaning - Spaghetti Explosion Mess

The state of my microwave is a direct consequence of allowing my kids to microwave their own food.  It is messy, and I am ok with that.  Letting them fix their own food helps them gain a sense of independence, and learning that an uncovered bowl of spaghetti will splatter the entire microwave will serve them well later in life.  The result was that I didn't have to manufacture a mess in my microwave to do this test, so in that sense this is a "true" test of this method; however, despite the volume of mess, it actually hadn't been that long since my microwave was cleaned, so I didn't have junk baked on by eons of use.  A truly baked in mess might have different results, as could different microwave materials, wattage, etc.  Moving on.

Comparison to Standard Cleaning Methods

I started by doing a wipe down of just the door using my favorite all purpose cleaner, by Method, and a clean rag.  I had no problem whatsoever removing the mess on the door using this method - it came right off.

Experiment

Then I started on the actual experiment.  There were a LOT of variations on this method, the one I chose to use was from Magnolia Magazine's 2nd issue, Simplicity.  The directions were;

In a microwave safe bowl microwave 2 cups of water, 2 tablespoons of vinegar, and a few drops of essential oil for 4 minutes, then let sit for 4 minutes.  Wipe clean.

I followed the directions exactly, even using a timer to make sure I waited just the right amount of time.  Since the type of essential oil was not specified I assumed it was added for the smell rather than any specific cleaning quality, so I used Lavender.

Results

After Microwaving the water and vinegar mix and wiping with a dry rag.

After Microwaving the water and vinegar mix and wiping with a dry rag.

After waiting the prescribed amount of time I wiped down the inside of the microwave with a clean dry cloth.  Some of the junk did come off, but it wasn't exactly miraculous.  There was still plenty of mess left after I wiped it down.

Recommendation

After scrubbing the microwave with the warm water and vinegar mix.

After scrubbing the microwave with the warm water and vinegar mix.

When just wiping the microwave with a dry cloth didn't really work, I decided to use warm water and vinegar as a cleaning solution.  I dipped my rag into the solution and wiped down the inside of the microwave with that.  The microwaved mess didn't stand a chance.  Huge amounts came out with every swipe of my rag and soon it was completely clean.

Conclusion

The simple act of microwaving water and vinegar did not mirculalously clean my microwave; however, the warm water and vinegar mixture that resulted from this cleaning hack was quite a good cleaning agent.  If you use this hack expect to do some scrubbing.

For more on cleaning, check out Hang You Hat, Episode 8:  Has On, Wax Off.

Does waxing your sink keep it cleaner longer?

Hang Your Hat Episode 8 just came out, and it is all about spring cleaning.  While doing my research for the show I came across a couple of cleaning hacks, a few of which were even good enough to try.  My favorite of these hacks was waxing the sink.  The idea is that waxing the sink will make water bead up on it, and gunk rinse down the drain easier, keeping the sink cleaner longer.  Since kitchen sinks tend to be one of the most disgusting germ filled areas in the home, and since my sink seems to attract filth like a magnet attracts ferrous metal, I thought it would be worth a try.

The Sink Before - Not Hiding the Shame Today

The Sink Before - Not Hiding the Shame Today

The close ups really do the filth justice.

The close ups really do the filth justice.

This is what my sink looked like when I started.  The close ups really do it justice.  I won’t deny it, it was filthy, and also the reason this hack appealed to me so much to begin with.  It always feels like as soon as I clean the sink, I blink and it is filthy again.  I was really hoping that this hack would give me a bit more time between serious scrub downs.

Step 1:  Thoroughly Clean the sink  

The sink needed to be cleaned before it could be waxed, so I went with a three step approach to getting it the cleanest it could possibly be.  I should note here that my sink is a stainless steel sink, and it can tolerate some pretty heavy cleaning.  Always make sure that the cleaning products you use are safe for the surface you are cleaning.

Baking Soda and Dish Soap

The first step in the cleaning was a good scrubbing with baking soda and dish soap.  This combo makes a slightly abrasive paste that is really good for cutting through heavy grime.  When I finished scrubbing I rinsed the paste off, and the sink was already looking a lot better.

Vinegar

Next I went in with a spray bottle full of vinegar and a scrubbing pad.  The vinegar is good at getting rid of water spots and minor lime scale build up (if you have heavy lime scale build up a product like CLR is a better choice).  Note here that I washed the baking soda off the sink before applying the vinegar.  Combining the two will not do anything harmful, but it probably won’t do anything beneficial either.  Since baking soda is alkaline and vinegar is acidic when the two are combined the Ph of the combination becomes neutral, like water.  Since I needed an acid for the water spots and the lime scale I did not combine the two.  

On a side note, you might notice vinegar reacting to lime scale if you have a lot of it.  It bubbles up just like it does when it is combined with baking soda.  This is because the lime, like the baking soda, is alkaline.  The reaction is a tiny bit of lime scale being eaten away by the vinegar.  

Once the vinegar was done doing its job I rinsed it off completely.

Bleach

Last I used a bleach based cleaner to disinfect.  Make sure the vinegar is completely washed off before applying the bleach because vinegar and bleach can create some harmful gas when combined.

I sprayed on the cleaner, and let it sit for 5 minutes to give it time to completely disinfect.  Then I rinsed it off.

After Cleaning

After Cleaning

This is what is looked like when I had finished cleaning it - It cleans up pretty good!

Step 2:

Dry the Sink

Before wax can be applied to the sink it must be dry.  I grabbed a clean dry cloth and wiped it down.

Apply the Wax

Next I applied the wax.  I used carnuba wax – just like the wax used on cars.  My family does not put anything directly in the sink that we will be eating later, so I felt comfortable using the carnuba wax.  If my family ever put food directly in the sink I would have used a food safe wax instead.  

The wax is easy to apply, you just get a bit on the applicator and rub it on the sink trying to apply a thin even coat on all of the sink surfaces.  If you leave a few globs, like I did, it is not the end of the world, it just takes those areas a bit longer to dry.

Remove the Wax

Let the wax dry completely before you remove it.  When it is dry it will look like a white, slightly powdery, haze on the surface of the sink.  

Once it is dry grab another clean dry cloth and wipe off the dry wax (and be amazed how much crap you still get off the sink even after all of that cleaning).  You should not see any white haze left once the wax has been removed.


Step 3: Test it

Even tiny drops of water bead up after the application of the wax.

Even tiny drops of water bead up after the application of the wax.

I was a bit nervous to test it.  I had such high hopes for this hack, and I really wanted it to work.  If it hadn’t worked I was going to be so disappointed.  Firebeard ended up getting some water when I wasn’t looking, some of which dripped into the sink.  It beaded up beautifully.  I spent the rest of the day rinsing things off in the sink and watching water and bits of food slide right down the drain without leaving a mark on the sink.  It was a beautiful thing to behold.

Step 4:  See how long it takes the filth to build back up again

And then I went on a business trip for 5 days.  Firebeard and the kids stayed home, and used the sink like they normally would.  It was rinsed out when dishes were done, but it was not cleaned or even wiped down.  This is what it looked like when I got back (and put the dishes in the washer):

After five days of use and no cleaning.

After five days of use and no cleaning.

Close up after 5 days of use with no cleaning.  

Close up after 5 days of use with no cleaning.  

Conclusion:

Holy Crap!  This is amazing.  I am never not going to do this ever again.  Five days after being cleaned and waxed it looks like it normally does five minutes after I clean it.  I don't know how this isn't standard Home Ec 101.  Really I could not be more pleased with how well this turned out.  You should definately give it a try!  I am heading off to wax the rest of the sinks in my house now.


To learn more about Spring Cleaning and cleaning Hacks check out Hang Your Hat Episode 8:  Wax on, Wax Off.  If you have a fantastic cleaning hack you would like to share, or have heard of one that might be worthy of a cleaning experiment, please let me know about it in the comments.

Ikea's New 2017 PS Collection

For the first time since 2014 there is a new Ikea PS Collection.  21 designers collaborated with Ikea to make 60 new products, ranging from furniture to drink mixes.

This collection targets Millennials, and other people that move a lot or live in transient or shared living situations.  The furniture tends to be small, light weight, portable and durable.  As a result, a lot of it looks a bit unconventional, and may not appeal to people living in more traditional circumstances.  However, I do think that for the most part, it does represent good design for the target audience.  For example:

2-seat Sofa with 36 cushions - $598

2-seat Sofa with 36 cushions - $598

This 2 seat sofa with 36 cushions looks a bit like lawn furniture covered in pointy clouds to me.  However the metal frame looks light weight and durable, and it separates into two pieces that make it easier to fit through small doors, carry up narrow stairways, and wedge into the corners of microscopic flats.  In other words - it is ideal for the intended audience.

This collection has several pieces like this sofa, that are great designs but don't fit my lifestyle, some designs that are right up my alley, and a few that just don't make any sense to me at all.  In my review of the new collection, I am going to break it up into these groups.


Good Designs that Don't Fit my Lifestyle

Valet Stand - $39

Valet Stand - $39

Valet stands are a great place to stage tomorrow's outfit.  This one is a great size for small spaces, and the wheels make it easy to move out of the way if it needs to share space with important things like doors; however, it's design is a bit too stark for me.  

Storage Unit - $129

Storage Unit - $129

This Ikea storage unit is fairly light weight, and the metal construction is durable, which makes it great for frequent movers.  It is also lockable, which is good for a shared housing situation (when roommates are not entirely trustworthy).  However, it feels a bit like garage storage to me.

Side Table on Castors - $139

Side Table on Castors - $139

This is just good design.  It is small enough to be a side table, portable enough to be used as a cart.  It can serve multiple functions which is key in a small space.  It's form just doesn't quite fit my taste.

Rocking Chair - $299

Rocking Chair - $299

This rocking chair will not find a place in my home, because it doesn't match ANY of my other decor, but I actually really love it.  It is such an unusual and inventive shape.  I feel like it would be a conversation starting piece.


Right Up my Alley

Throw - $34.95

Throw - $34.95

Who doesn't love a good throw?  This one is a beautiful emerald color with an interesting texture.

Vase, Set of 3 - $34.95

Vase, Set of 3 - $34.95

I am always on the look out for interesting containers that can be used in multiple ways and these fit the bill.  They are large enough to hold things like fruit, and pretty enough to hold flowers, or to be displayed on their own.  They also come in nearly opaque white.

Mug with Lid - $8.95

Mug with Lid - $8.95

I don't know why I like this mug so much.  I have plenty of mugs.  I don't need another mug, but I want this one.  I think it is again the shape that I find so appealing - I have never seen a mug this shape ever before.

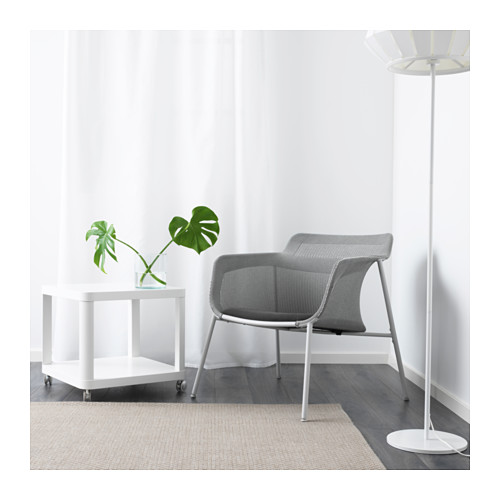
Armchair - $299

Armchair - $299

This arm chair is one of the first things that caught my eye in this collection.  I love the sleek simple lines combined with the unusual mesh fabric.  Ikea seems to be envisioning these in a living room type of setting, but to me they look like an office guest chair that your guests might actually want to sit in.  It would also make a really good occasional chair in my home; however, I would have wanted it to be stackable for that use so I could fit multiples in a small space and drag them out as needed.  The only real problem I see with this chair is the price tag.  It is in the same price range as most of Ikea's large upholstered arm chairs, and it just doesn't look like it is in the same league as something like the Strandmon Wing Chair.  However, if it is as comfortable as one of the big arm chairs, then it would be a good choice for a living room that was very short on space.

3-piece self-watering plant pot set - $39.95

3-piece self-watering plant pot set - $39.95

This plant pot is my favorite piece in this collection hands down.  It is beautiful, and functional, and I need like 5 in my house right now.  I think the price is a little bit high when compared to Ikea's other pots and plant stands, but not excessively so.  Of all of the pieces in this collection, this is the one that I can say I will absolutely be putting in my home.  


What were they thinking?

Seat/Floor pad - $59

Seat/Floor pad - $59

This is a seat/floor pad, but why you would want it I don't know.  Ikea's picture of it has it on the floor like a yoga mat, but the surface is plush fabric, so you couldn't actually use it as a yoga mat, and it looks much too thin to sleep on.  Based on the velcro closures on the top it might work as a car seat cover, but it wouldn't fit well.  To top it all off it is $59.  Just think, all of this uselessness for less than $60.

Coffee Table - $59

Coffee Table - $59

This coffee table is less than 2 feet by 2 feet, and looks like a short TV tray table.  It is at best a side table, and not a particularly good looking one at that.

LED multi-use lighting - $34.95

LED multi-use lighting - $34.95

This is a flashlight that has to be plugged in and lives in a cage.  Someone please enlighten me on why anyone would want this.  Why wouldn't you just use a flashlight?  Half of the purpose of a flashlight is that it is portable, and this isn't.  To top it off it is $34.95.  I could get a flashlight and some good rechargeable batteries for much less than this.  I just don't get it.

Throw with zipper - $49.95

Throw with zipper - $49.95

This one was so incomprehensible to me I had to include two pictures.  It is called a throw, but looks like a quilted vest.  Without the person in it it looks like a normal size vest, with the person in it, it looks like a vest that was made for a giant.

I guess it is supposed to be like a snuggie, but somehow it is even less attractive than a snuggle (and I didn't think that was possible). Then there is the price - $50 - for this.... this.... thing. 


If you would like to learn more about Ikea, check out this week's episode of Hang Your Hat,  How is the Kullen Coming Along.  I go into the history of Ikea, including some troubling past events that I am sure Ikea would rather keep buried, as well as how they are working toward sustainability and social justice now.

The Bathroom Reveal

The blog has been a bit neglected lately since I don’t have a lot of spare time, and I have been spending most of the time I do have on the podcast (which is getting better and better each week – check it out!).  It hit me the other day that I had never officially revealed how the bathroom looks now that we are finished with our mini remodel.  Let's remedy that now. 

Before I reveal how good it looks now, I want to remind you how it looked when we started.  Our house was built in 1977, and while it had been well maintained, maintenance was about all that had been done to it.  The late 70’s and early 80’s were still alive and well in our home.  The hall bathroom was a 1970’s builder’s special – basic, beige, and boring.  It was serviceable, there was nothing really “wrong” with it, but it felt dingy no matter how much you scrubbed it and the atmosphere was far from relaxing.

After the shower doors were removed.

After the shower doors were removed.

We started the bathroom’s transformation, with removing the stuff that couldn’t be salvaged.  The Shower doors were the first to go.  It felt SOOO good to get those out – they were gross, and no amount of bleach and scrubbing would get the parts under the door seals clean!  Next we removed all of the caulk ….. the ridiculously bad, hideous caulk.  It was really terrible.  It was like they had a bad caulk, and decided to cover it up with more bad caulk – repeatedly.  It looked like an incredibly cheap hack job.  If we had done nothing in the bathroom but replacing the bad caulk, it still would have been a huge improvement in the appearance of the whole bathroom. 

Significantly Cleaner Looking after painting.

Significantly Cleaner Looking after painting.

Next we decided to cool things down a bit.  We painted the walls in BM Paper White, a cool, almost white grey, and the trim in BM Simply White.  This left the tiles in the bathtub surround looking distinctly pink.  Since new tile was not in the budget, we painted the tile using Rust-oleum tub and tile paint.  I admit the tile looked great, but if I had it to do again I don't think I would paint the tile, I just don't think it will be very durable.  

The bathroom cabinet after a coat of paint, new hardware, and a refinished countertop.

The bathroom cabinet after a coat of paint, new hardware, and a refinished countertop.

Cabinet interior after paint and new flooring.

Cabinet interior after paint and new flooring.

Next, we completely refinished the cabinet, inside and out.  It received a new paint job, and hardware.  The countertop was also refinished.

Floor Tile:  Before decades of dirt, after nearly new!

Floor Tile:  Before decades of dirt, after nearly new!

We even made the tile look nearly new by refreshing the grout.

While there are still a few things we would love to update as time and budget allow (like the mirror), the end result of this mini makeover was even better than we expected.  The bathroom looks fresh and clean, and it has a bit of personality now.  Something that was really lacking previously.

The beautiful Danica Odyssey shower curtain, that was the inspiration for the entire bathroom transformation.  I still love it and think it was a great choice.  It really makes the bathroom feel like a kid friendly space, without being a kid's space.

DSC_0203.jpg

To finish off the look I added a neon pothos in an aqua orchid pot, and some beautiful photos of the ocean.  The photos were given to Firebeard and I by the photographer, Joe Boris, for our wedding, and they are beautiful.  If you are looking for a photographer in the Atlanta area he is your man.  He does everything from lifestyle photography to corporate photography, and his work is impeccable.  

I think the most shocking thing about these before and after pictures is that one of the few things we didn't change in this bathroom was the lighting.  Initially we had fully intended to change out the lighting, because the bathroom just seemed SOO yellow when we started the makeover, but once we removed the yellowy beige paint from the walls and ceiling the room transformed.  Without yellow reflecting everywhere the room suddenly seemed bright, white, and cool.  It was an amazing visual transformation that we really didn't expect.  

To see all of the details of the bathroom transformation, including our many trials and tribulations, you can find them all here.

Stay turned for additional mini remodels!

DIY Midori Style Traveler's Notebook

Recently, my friend the Good Doctor directed me to the Darbin Orvar You Tube Channel, and I fell in love.   It is filled with DIY ideas, and building projects that are simple, creative, and beautiful.  One of the projects that immediately caught my attention was their DIY Midori Style Traveler's Notebook, and I knew I had to make it.  Unfortunately, the Darbin Orvar Tutorial was a bit light on measurements, so I had to figure out a few things as I went along.  It really wasn't a problem, because the notebook is really very simple, but I thought I would share the measurements I used, in case it helps out anyone in the future.

Cover:  A sheet of 8.5" x 11" leather by ArtMinds

Cover:  A sheet of 8.5" x 11" leather by ArtMinds

I started with an 8.5" x 11" piece of thick yet flexible leather (215.9mm x 279.4mm) by ArtMinds found at my local Michaels.  It is sold out online as of my writing this, but it is really similar to this leather sold by Amazon.  I used it as my cover, and it really dictated the dimensions of the rest of the journal, including the paper inserts.  Had I had a larger piece of leather available initially, I think I probably would have let the paper inserts determine the size of the notebook, but in the end I am very happy with the size of my finished product, and I am not sure that I would change the size if I make another.

Prepare Cover

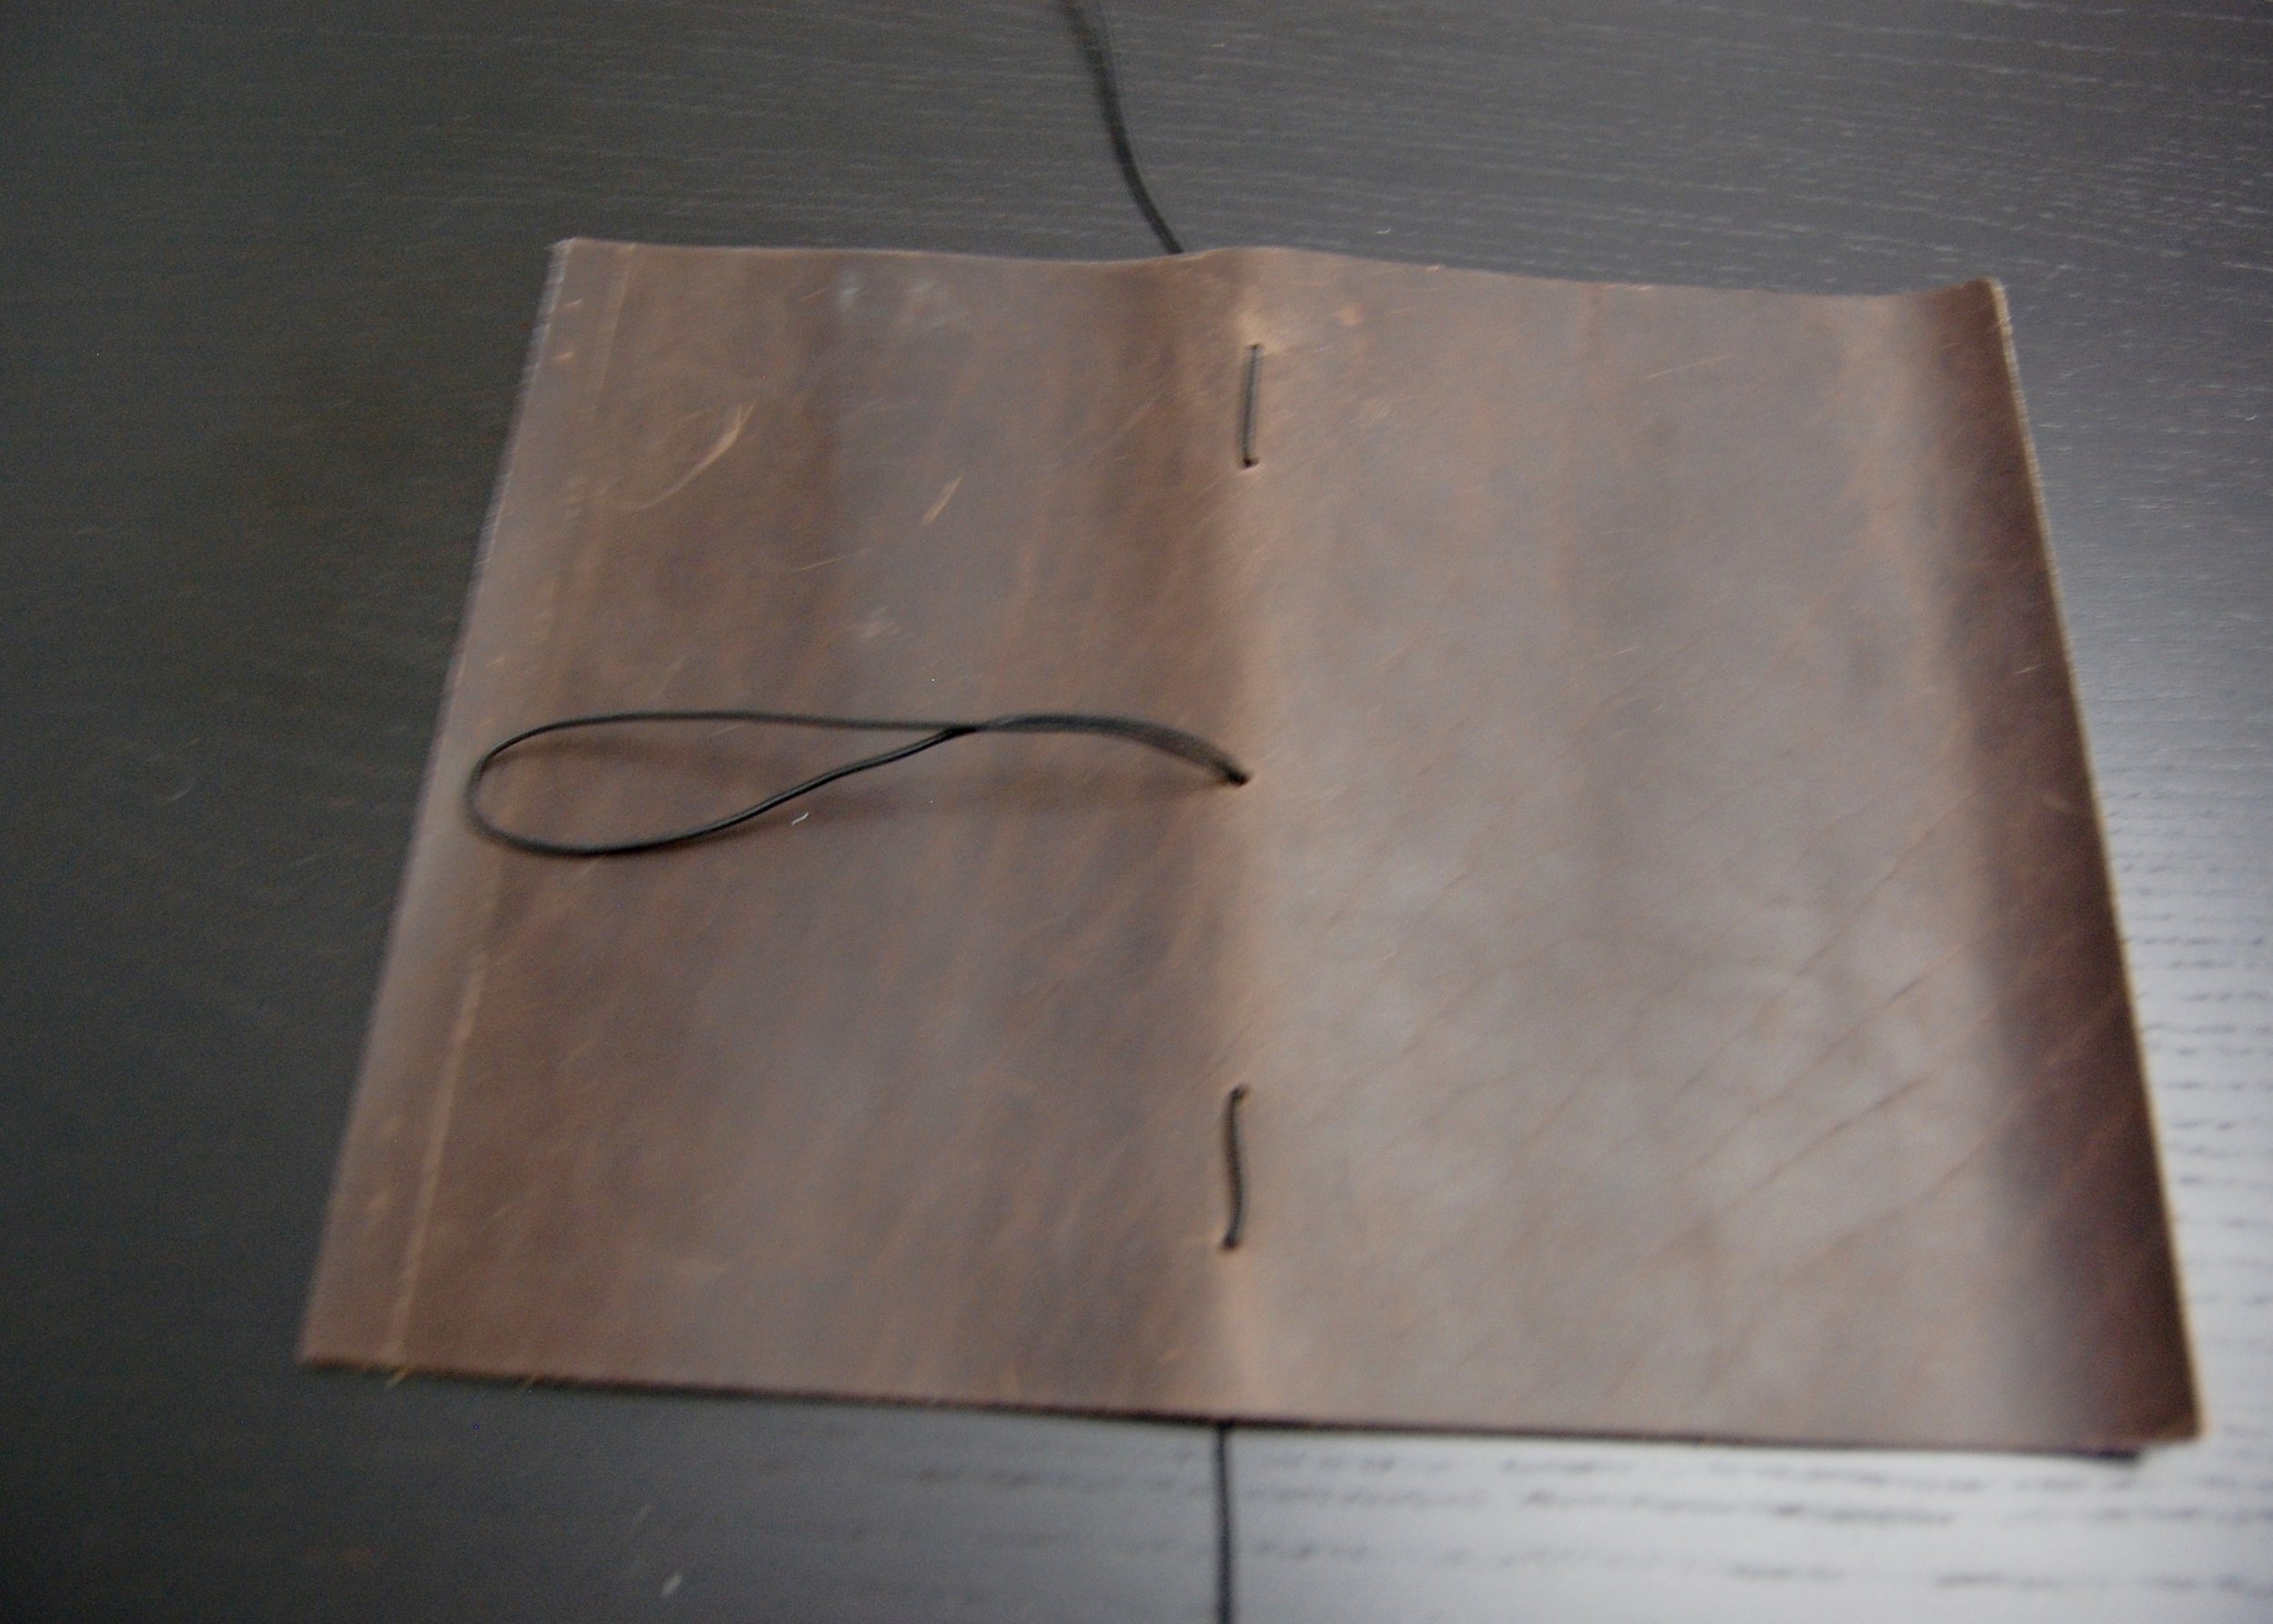
You have to create holes in the cover to connect the cover to the paper inserts that you put inside it.  The holes need to be big enough to stick a piece of round elastic through them.  In the original tutorial Lin from Darbin Orvar used what I think was a leather hole punch like these.  I did not have a leather hole punch, so I used this sewing awl (on a side note, I use this tool ALL the time, it has been especially useful in the kitchen, and I highly recommend it).  I think Lin's leather punched holes look a bit neater than mine do, but I think mine still look pretty darn good.

I placed my holes 5.5" (139.7mm) from each short side of the leather, and then on that axis I placed holes 1" (25.4mm) from each long side, then 2" (50.8mm) from each long side, and then one hole 4.25" (107.9mm)  from each long side.  I made five holes total.  If this is hard to visualize, check out the picture of the leather after I had made the holes.

Create Inserts

Gather Paper and Prepare for Sewing

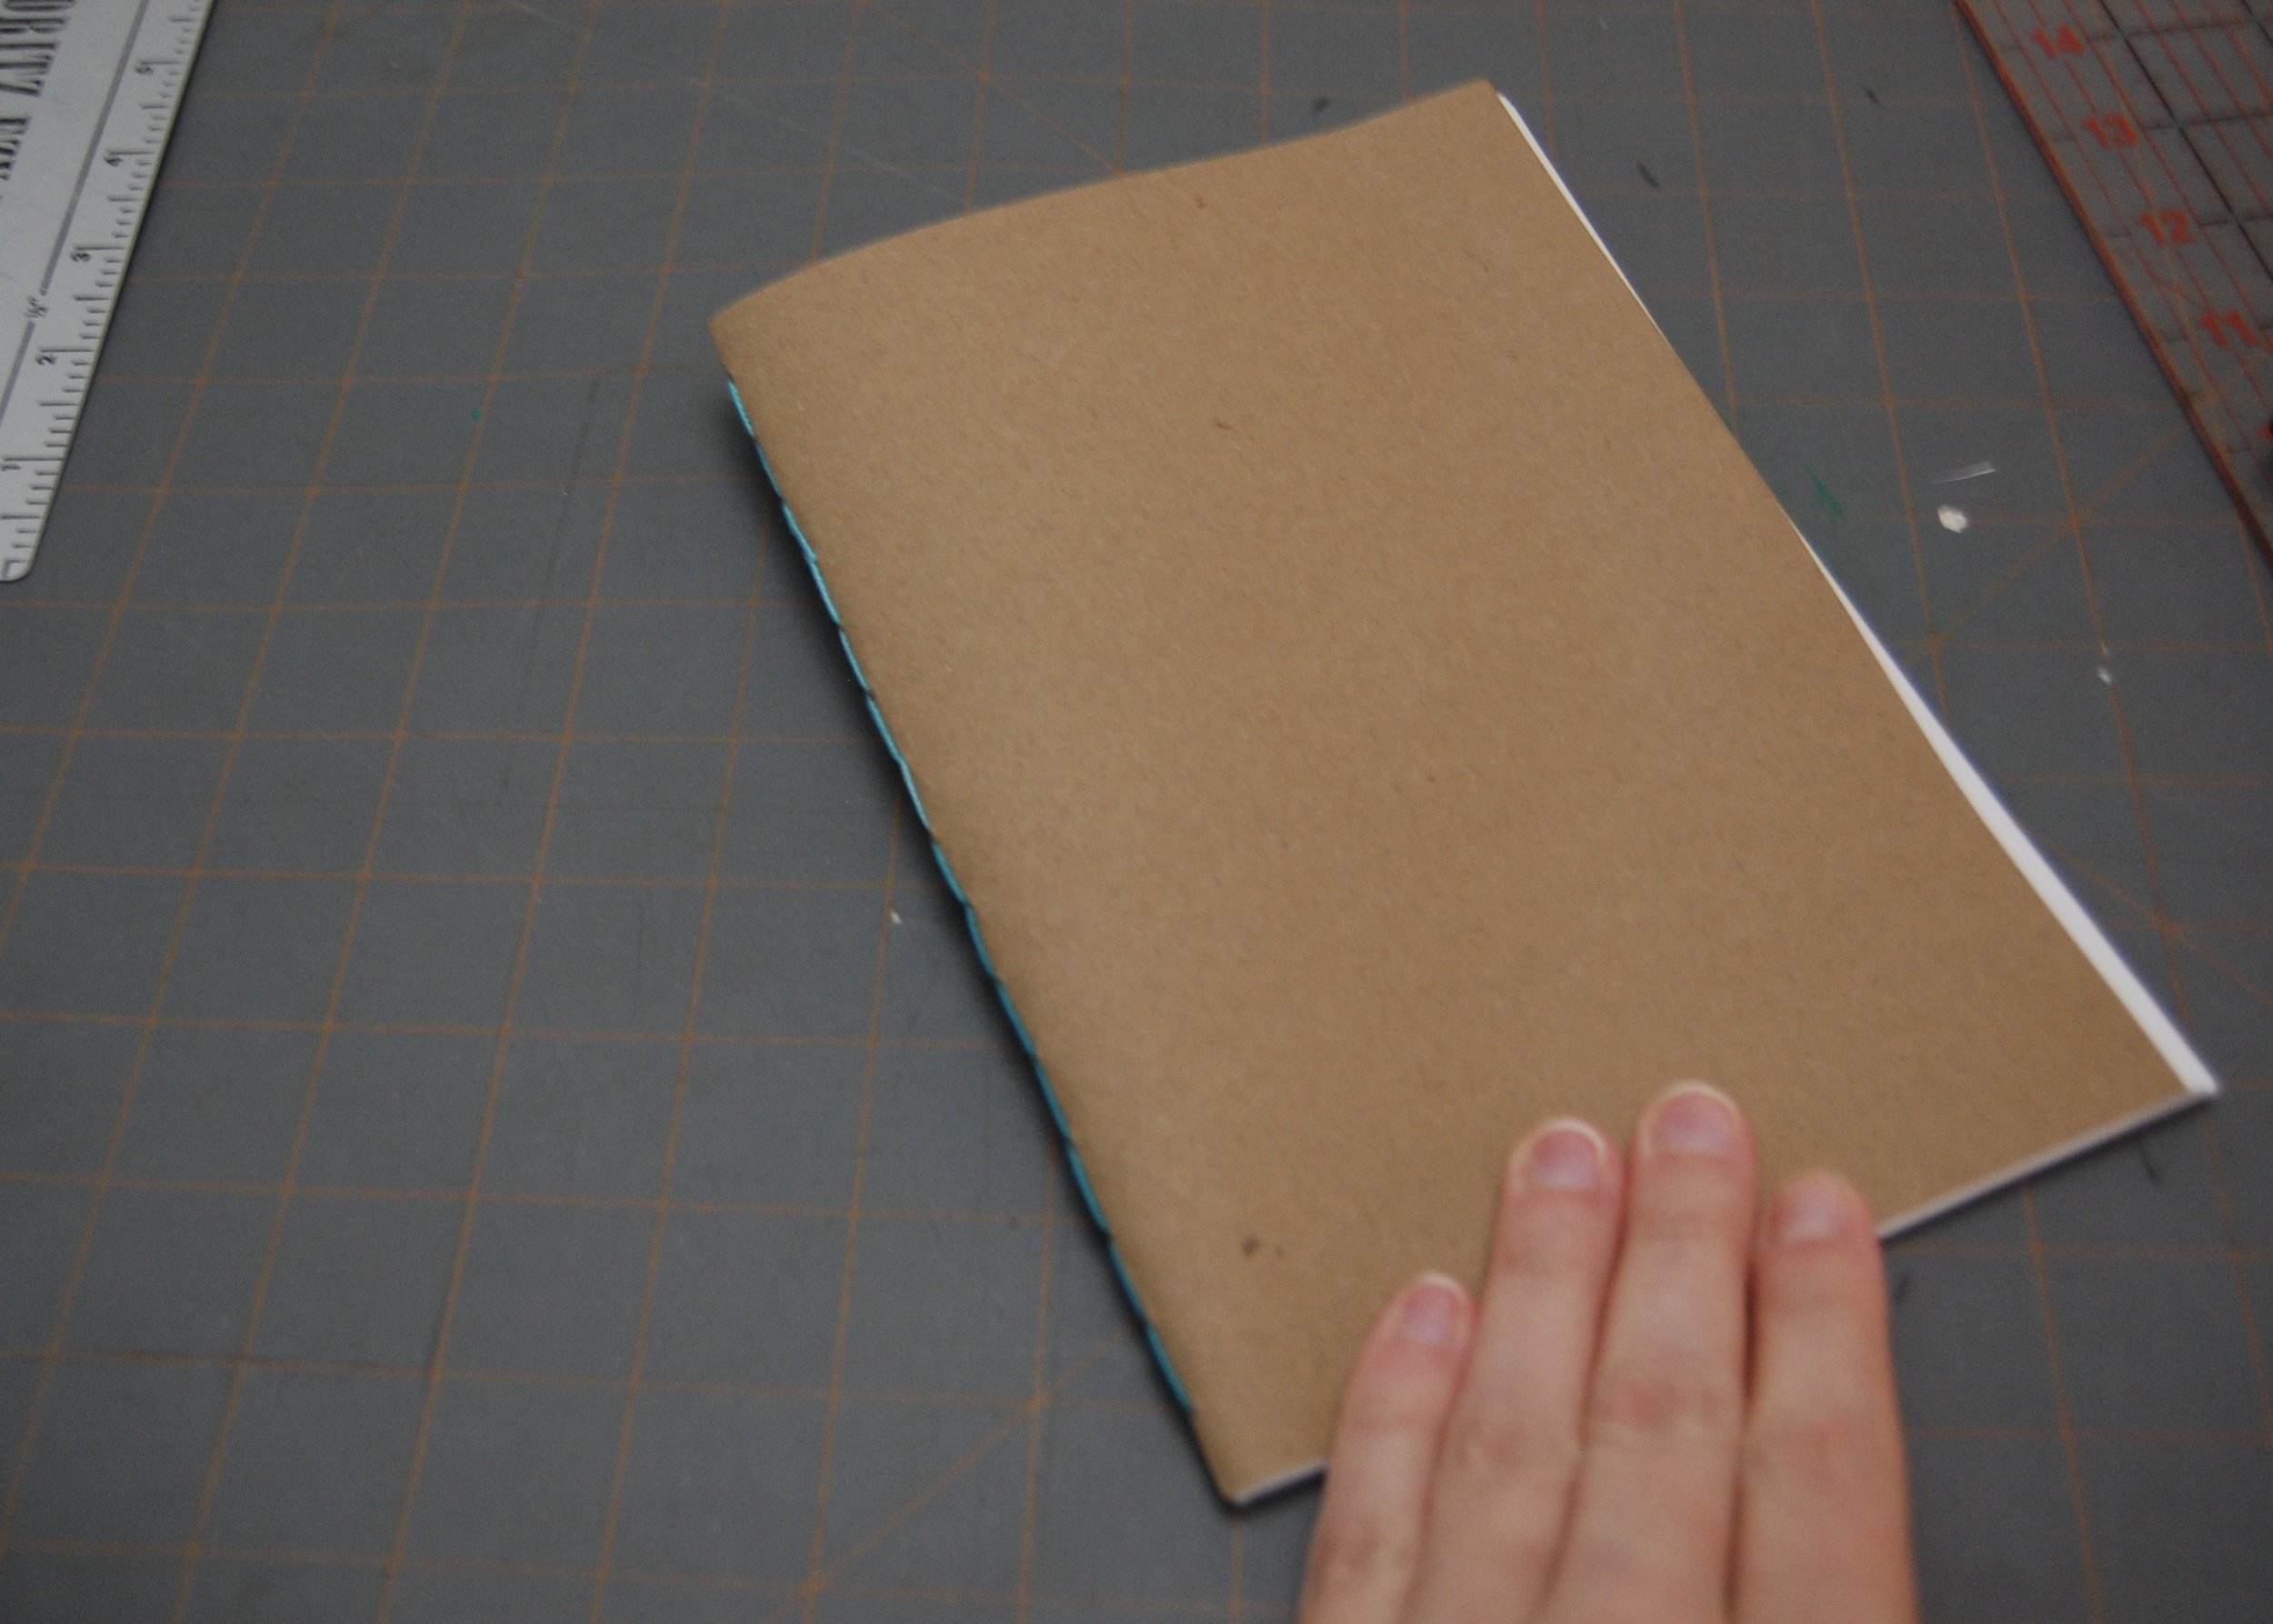
For my inserts I used 15 sheets of standard 8.5" by 11" (215.9mm x 279.4mm) paper for the interior and a piece of heavier weight craft paper for the cover.  I started by folding the paper short sides together in bunches of three pieces (it helps to crease the folded edge with a straight edge, like a ruler), and put the bunches together to form a book.  Since I wanted the height of my inserts to be slightly less than the height of my notebook, I then reduced the height of the insert by cutting off .5" (12.7mm) with an xacto knife (the total size of the paper being inserted was now 8" by 11" or 203.2mm by 279.4mm).  In retrospect it may have been easier to cut the paper prior to folding it. 

To make it easier to sew the paper together I punched holes along the fold as well.  First I unfolded all of the sheets and clipped them together with large paper clips to keep all the pieces in place.  Then I marked where my holes would go along the fold line every half inch.  Finally I used the same awl from earlier to punch the holes where I had marked.  

Sewing the Insert

To sew the insert I chose some variegated plied embroidery thread that I already had in my stash, because it was the thickest thread I had, and I thought it would be pretty.  I sewed using a large embroidery needle.

I sewed a running stitch, starting in the middle inside of the insert, and worked my way to one edge of the insert, turned around and sewed back to the other edge of the insert overlapping my previous stitches, and then turned around again and sewed back to the middle.  This left me with two tails in the middle of the insert which I knotted together using a square knot.  

Cutting the Insert to Fit

Your insert will now be too wide for your cover, so it will need to be cut down.  I cut mine down by .5" or 12.7mm (making the total paper size 8" x 10" or 203.2mm x 254mm).  With three inserts in my notebook, my cover is just big enough to cover my inserts.  If you wanted a little extra overlap by your notebook cover you might want to cut the inserts down by .75" (19.05mm); however, if you were using fewer inserts you might need to cut the insert down by only .25" (6.36mm).

Adding the Elastic and One Insert

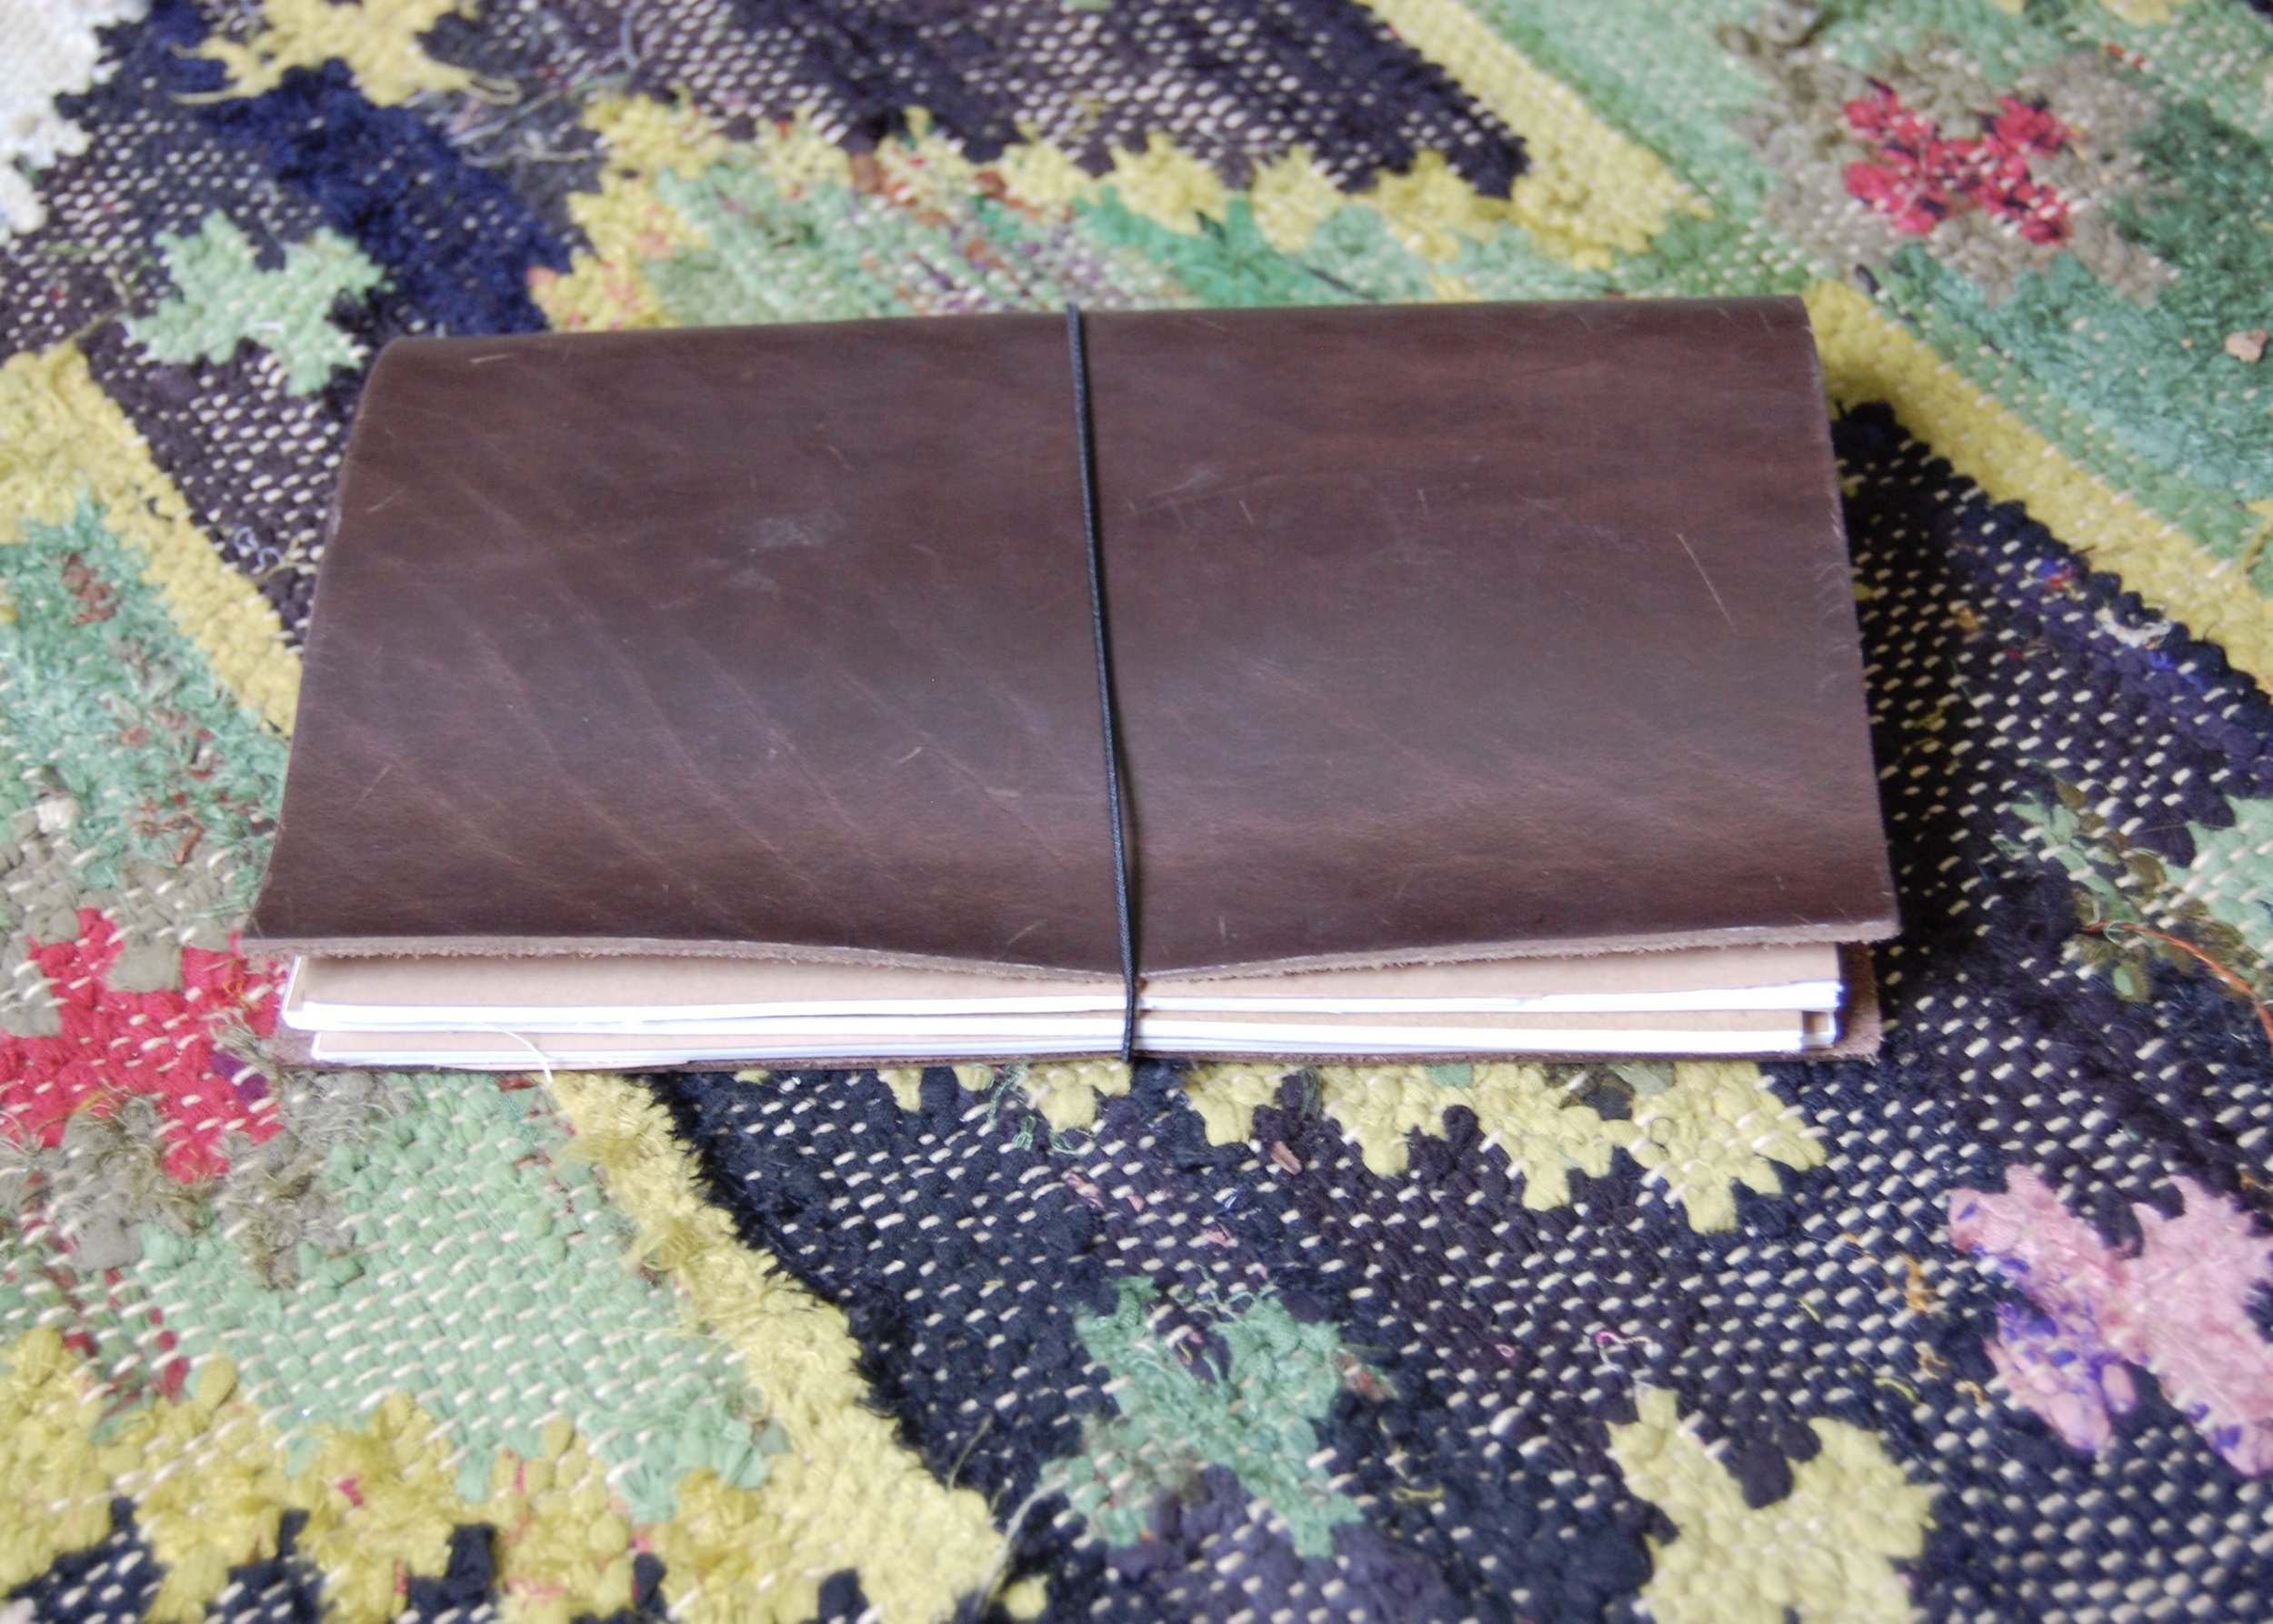
To attach the inserts to the notebook cover and to keep the notebook closed, I used this round elastic from Dritz.  Start by cutting the elastic down to size - I cut a 36" (914.4mm) piece.  Then fold the elastic in half.  the folded part of elastic should be inserted into the middle hole in the notebook cover from back to front.  The elastic should then be pulled through so that it makes a loop that is the same length that the cover is wide (5.5" or 139.7mm).  

At this point, the remaining portion of the elastic will be two tails on the inside of the cover.  One tail should be inserted in the next closest hole toward the top of the cover, and the other in the next closest hole toward the bottom of the cover.  The insertion direction is from the inside to the outside of the cover.  The loop that was made earlier should remain.

Turn the cover over so that the outside of the cover is facing up.  The elastic tails should be coming out of the second holes from the bottom and top of the cover, respectively.  Insert the top tail in the hole closest to the top of the cover, inserting from front to back.  Do the same for the bottom tail, in the bottom hole.

Turn the cover over once again so that the inside of the cover is facing up.  The elastic tails should be coming out of the upper and lower-most holes in the cover.  Open one insert to the middle page and place the spine of the insert over the spine of the cover.  Now gather the two elastic tails over the insert and tie them in a knot, holding the insert in place.

Adding Additional Inserts

To add additional inserts, gather two inserts and a piece of round elastic about 20" (508mm) long.  Open the inserts to the middle pages, wrap the elastic around the middle of each insert, and tie the elastic in a knot.  This will connect the two new inserts.

Next slot one of the two new inserts underneath the insert that is already attached to the notebook cover, leaving the second of the new inserts on the opposite side of the original insert.  The elastic holding together the two new inserts will be held in the notebook by the elastic holding the original insert in place.

Finished

Thats it!  Enjoy your new notebook, and let me know about all of the places you travel with it!


This post contained affiliate links.  All opinions are my own.

Why I switched to a Lego Christmas Village

DSC_0246.jpg

In our last house we stored our Christmas decorations in the attic, the opening to which was in the middle of the garage about 14 feet from the floor.  We used a winch system to get things into and out of it – including ourselves occasionally.  Using a ladder with a large box that high up was just terrifying.  One day, as we were getting the Christmas boxes down from the attic for the season, one of the boxes slipped from the winch harness a foot or two from the floor.  That box happened to contain my fragile glass Christmas village.

The damage really wasn’t as bad as it could have been, but I was still pretty upset.  I glued the houses back together, telling myself the cracks gave them character (like they had been through the blitz).  That year, and for several years after, I displayed the houses on a high shelf, far out of the reach of kid’s hands, and dog tails, and even me.  And then one year, after the kids asked to play with the little houses for what seemed like the 400th time, and I had said no for the 400th time, I realized that the Christmas village had become something that caused me stress rather than joy during the holiday season, and I wanted to change that.  I still wanted a Christmas village, I had fond memories of my Grandmother’s Christmas villages and tiny train sets from my own childhood, but I wanted one that I could let the kids play with and didn’t have to worry about them breaking.

The boy’s Christmas time Lego catalogue provided the answer – a Lego Christmas village.  I had seen the Lego Christmas houses previously and thought they were adorable, but it suddenly hit me what a good idea they were.  If they fell out of the attic, they could be rebuilt.  If the kids broke them they could be rebuilt.  If the dog knocked them off the table they could be rebuilt.  I could let my kids play with the Lego Christmas village, and the tiny houses, and people, and cars could become fond Christmas memories.  And it was just so cute! My Christmas village could again become part of the joy of the holiday season, rather than a source of stress.


Now I have several pieces from the rather small Lego Winter Village collection.  They come out with a new model every year, and every year I look forward to adding to my little village and sitting with my kids and putting the pieces together.  The only stressful part is making sure that I place my order before they all sell out.

Consumable Christmas Gifts

On Episode 2 of Hang your Hat, Firebeard and I did a segment on consumable christmas gift ideas.  These are gifts that are meant to be used up, so they don't hang around cluttering up the house.  Since then I was asked if I might be able to do a visual version of the list perhaps with  links to some of the products we mentioned, and I am happy to oblige.  

Note:  This list contains gifts big and small.  While some would be appropiate for the year's "big" gift, there are also several that would make great stocking stuffers. 

Consumable Gift Ideas

Bath/Body/Grooming (many of these are easy to DIY):

Food (Most of these are easy to DIY):

  • Candy, Cookies, or Carmel
  • Hot Cocoa Mix (Single servings are good presents for office mates).  Add some homemade marshmallows to make it really special.
  • Flavored Sugars or Salts
  • Infused Liquors or Vinegars
  • DIY Vanilla
  • Flavored Simple Syrups (great for drinks)
  • Good Quality Olive Oil
  • Bottle of Wine
  • Meal Kit 
  • Fancy Coffee
  • Local Honey
  • Drinks Kits (ex. Cocktail kit)
  • Special Snacks (that are not normally on the menu)

Services: (Think Gift Certificates)

  • Massage
  • Facials
  •  Mani/Pedis
  • High End Barber Shops / Hair Dressers
  • Oil Change or Car servicing (especially if the person you are giving the gift to normally does these things themselves)
  • Baby Sitting
  • House Cleaning
  • Photographer

Subscriptions:

Gift Cards:

  • Any Favorite Retail Store the recipient is likely to shop at (maybe somewhere that is normally too pricy for the recipient – just make sure that the gift card could cover the cost of an item at the store)
  • Itunes
  • Grocery or Gas Cards (good for college students or recent grads)
  • Coffee Shop
  • Book Store

Entertainment/Events:

  • Burlesque Shows or Vaudeville Performances
  • Sporting Event.  Of course Football and  basketball games come to mind first- but why not a fencing or ballroom dance competition
  • Tickets to the Movies 
  • Tickets to an Amusement Park, Museum, or zoo
  • Fancy Tea Party
  • Concerts or Plays


Active Pursuits:

  • Pay for a Goruck Challenge
  • Gym Membership (Think outside the box and go for something like a rock climbing or cross fit gym rather than the standard gym)
  • Sporty Classes (like belly dancing class)
  • Goods that are consumed while participating in a sport (ex. Bike tubes for a cyclist, chalk for a rock climber or gymnast, and dehydrated food for campers)

Miscellaneous:  

  • Hobby or Craft Supplies (ex. Scrapbooking paper or stickers, yarn, paint)
  • Kids Craft Supplies (ex. tape, stickers, erasers, glue, pipe cleaners, pompoms, googly eyes)
  • Fireplace Supplies (ex. Wood, fire starters, matches, bundles of dried herbs, pinecones dipped in wax)
  • Personalized Photo Calendar
  • Starting a 529 College Savings Plan