Summer Wrap Up

In Florida summer temperatures can last well into November, so the end of summer is marked by events rather than the changing of the season.  Today officially marked the end of summer in my household.  It was the first day of school.  

The girl started second grade, and the boy started first.  Fire Beard also started his second year of law school.  He moved back to school last week so it is just me and the kids again.  It was really nice to have him home this summer, and for that reason and many others I am sad to see this summer go.

On the up side, now that our schedules are back to normal, I should have more time for crafting, organizing, blogging, and maybe even a few other things. I have done a lot this summer, and I can't wait to tell you all about it. So stay tuned. 

FO - Hitchhiker Shawl

Pattern: The Hitchhiker Shawl by Martina Behm 

Yarn:  Gerwerken Knits Socks (yes, it’s my hand dyed!  Stay Tuned!)

Needles: US 2,

Began: Approx. 5/1/2013

Completed: Approx. 6/8/2013


Martina Behm is my new favorite pattern designer!  Her shawls are wonderful.  They use simple shapes, lots of garter stitch, and are designed to use the amount of yarn that you actually have, so they are great for stash busting or a special skein.  I love that they are feminine without being lacy.

I have been very inspired by all of the wonderful garter stitch shawls out lately.  Designers like Martina, Veera Välimäki,  and Ysolda Teague have recently shown how beautiful and versatile garter stitch can be.  It is nice to focus on color and form without worrying about which stitch to use, and whether you will be able to block the finished object enough that the edges don’t roll up.

I already have Martina’s other patterns inspired by the Hitchhikers guide to the galaxy, and will probably start another one when I am finished with Liesl, although her Leftie shawl is very tempting as well!  All of the little leaves would showcase some hand dyed yarn very nicely.  Then again, there is a world of patterns out there that is growing all of the time…


Monogrammed Napkin Tutorial

These pretty monogrammed napkins are a great last minute gift. They take less than 1 hour to make, with the exclusion of washing and drying the napkins.

How To

Materials:

  • Napkins, I used
  • Iris Napkins from Ikea ($1.99 per 4)
  • A Monogram
  • Iron-on transfer paper
  • A computer and printer
  • Iron

Process:

  1. Wash and dry your napkins as per their washing instructions to remove any chemicals present on the napkins.
  2. Create or find your monogram.  I used Photoshop to modify a font that suited my purposes.
  3. Using regular paper test print your picture, using all of the settings you plan to use in the final printing.  Make sure this test printing is the correct size and color, and is printed in a mirror image if your picture needs to be read.
  4. If necessary modify your picture and test print again, until the picture is perfect.
  5. Print your final image on iron-on transfer paper (remember you will need one monogram for each napkin).
  6. Following the directions on your transfer paper, iron the monograms onto the corner of your napkins.


WIP - Liesl Cardigan

I became smitten with Malabrigo Rios in Pearl Ten when my LYS (Really Knit Stuff) had a sale recently, but there was a problem.  They only had 4 skeins (about 800 yards)!  Being a selfish knitter, with more than enough hats and scarfs, and not nearly enough adorable cardigans, I had a problem.  I wanted a cardigan, but I couldn't possibly knit one with only 4 skeins.  Enter Liesl.

Liesl is a Ysolda Teague Cardigan with impossibly little yardage.  Liesl’s yardage is advertised at between 175 and 733 yards.  Frankly I thought it was a typo until I saw several people on Ravelry claiming they had knit the cardigan with less than 300 yards.  I thought surly, if they can knit Liesl with less than 300 yards, I should be able to knit it with 800!  Right?  I didn’t believe it, but I cast on anyway.

I have knit a bit over 100 yards at this point and have already reached the underarm (the pictures were taken a few days ago).  I am starting to believe that I might actually have left over yarn when I am done!

Asheville Yarn Shops

While Fire Beard and I were in North Carolina I visited a few yarn stores up in Ashville.  Ashville, if you are not familiar with the city, could easily be referred to as the Portland of the South East.  It is packed with Locally Owned stores, coffee roasters, breweries, street musicians, and crafters.  I am a big fan.

Downtown, on Wall street, a few store fronts from a climbing gym and vegan friendly restaurant, is Purl.  It is the only yarn store I have ever been in that had more male customers than female, and the only yarn store I have ever been in that is organized primarily by color.  I expect it would be a dream come true for a yarn driven knitter, but as a pattern driven knitter, the yarn organization is not my cup of tea.  I find it hard to find what I am looking for at Purl without asking for help, but it is wonderful visual inspiration.

I was very happy to see truly local, North Carolina Spun yarn represented at Purl.  The local yarn was a surprisingly competitive price, but I was a bit disappointed with the quality of the spinning.  The local yarn that I saw was inconsistently spun singles.  It looked lumpy, rather than artistically thick and thin.  I did not buy any.   Nevertheless, it was very nice to see a local product, and I plan to buy some next time if the quality is better.

We also stopped at Yarn Paradise, on the south side of Ashville, and there I did buy a couple of skeins.

Yarn Paradise is a fairly average, but well run yarn store.  It has a large selection of well-known yarn brands, and the staff was friendly, helpful, and quick to steer me toward the sales.  I picked up two skeins of Malabrigo Finito in Paloma, a yarn Malabrigo produces only once a year from the finest quality wool available.  It is incredibly soft and beautiful.  I think it may become a scarf or small shawl.

I still have a few yarn stores to visit next time I’m in Ashville, and I am hoping I will find one that has the character and personality of Purl, with the management of Yarn Paradise.  Any recommendations?

North Carolina - Part 2

The mountain cabin is nestled into the side of a mountain, fairly high up, but not at the top.  While it is not a big house, it is very comfy with its wooden floor and ceiling, over stuffed couch, and it’s wide back deck looking over a sea of wild flowers and Irises.

My favorite thing to do at the cabin is sit in a rocker by the fireplace and read or knit while a fire crackles merrily in the grate.

If we are feeling ambitious we hike up the nearby Whiteside Mountain.  The mountain is considered one of the best climbing areas in the southeast with its uninterrupted sheer cliff faces, but it also has an easy hiking trail to the peek.  In recent years, handrails have been added or repaired so that the access to the cliff face is more limited, but it is still possible to hike to the very edge in some spots.

North Carolina - Part 1

​About this time last month was my 9 year Wedding Anniversary.  Fire Beard and I were finally able to celebrate on memorial day weekend.  We took a trip up to the family cabin in North Carolina, and had a wonderful time.

​We took my old dog with us, knowing it might be his last trip since he has late stage lymphoma.  I don't think anyone would have guessed he is ill.  He seems to have forgotten himself.

dscf3880.jpg

​We spent nearly every evening at the dock near the cabin, throwing sticks into the water for the old dog to fetch.  He is not as buoyant as he used to be, but he didn't seem to mind.

Earth Day

I hope you all had a wonderful Earth Day. My family celebrated by spending some time outside in nature at the lake near our house.

20130422-080442.jpg

20130422-080442.jpg

While we live in Florida, no it was not warm enough to go swimming this weekend.

20130422-080546.jpg

20130422-080546.jpg

This was the result of indulging in cold water fun.

20130422-080701.jpg

20130422-080701.jpg

Once they warmed up a bit, the kids decided that playing on the shore was just as much fun as swimming.

~Gerwerken

Dying Wool Yarn with Rit

20130408-220116.jpg

20130408-220116.jpg

Rit is an inexpensive dye that can be found in the laundry section of grocery stores across America. If you are an average American that wants to dye a piece of cotton clothing Rit is probably the dye you will turn to. I myself have turned to Rit on multiple occasion to dye clothes, and on multiple occasions I have been disappointed with the results.

What I had not realized is that Rit is an acid dye, and despite the proclamation on the box that it is suitable for dying cotton, Rit, like all acid dyes, is terrible at dying cotton. To dye plant fibers, like cotton or linen, you would use a fiber reactive dye. To dye an animal fiber like wool or silk,you would use an acid dye, like Rit.

How to Dye Wool Yarn with Rit - Uniform Color

20130408-213658.jpg

I started with some yarn I had previously dyed with a food safe acid dye. I had not been happy with the washed out red, and decided to over dye it with Rit's dark red wine color.

20130408-214053.jpg

Since I wanted uniform color, I started with a dye pot large enough for my yarn to move freely. I filled it with water, my dye, a cup of vinegar, and my yarn (already wet). Then I turned up the heat.

20130408-214529.jpg

Slowly heat the water to almost boiling, and occasionally move the yarn within the pot very gently. As the dye is absorbed, the water will become lighter in color.

20130408-214823.jpg

When the water is as light as it is going to get (clear if you added just the right amount of dye), and you yarn is the color you want, turn off the heat, and let the water slowly cool.

When the yarn has cooled, fill a container with water the SAME temperature as the water in the dye pot, then rinse your yarn. If all of your dye was incorporated you should see little to no color run off.

Now it's your turn! ~Gerwerken

Note: When dying your yarn take care to change temperatures slowly and move the yarn gently. Abrupt temperature changes and agitation of the yarn will turn it into a large felted lump. Also, don't use kitchen implements that will later be used to cook food!

The Power of Less - Stash

A crafter's stash consists of the materials required to engage in that craft. It may consist of yarn, fabric, paint, beads, bits of metal, or anything else required to engage in the craft. I would venture to guess that all crafters have some stash whether it is boxes and bag full of materials that would last a lifetime, or only enough for the next project. I would also guess that, given enough time, crafters will experience the inexplicable phenomenon of their stash growing of it's own accord. Given the number of crafts that I engage in, and the amount of time I have been crafting, my stash is pretty small; however, the amount of space allocated to my stash in my tiny house is even smaller. After cleaning up the working area of my little craft studio last week, and putting away all of the pieces of my stash that had been left out, I realized that the cabinet in which my stash is stored needed a good de-cluttering too.

20130403-130638.jpg

Here is the before and after! Wow, look at the difference! What is the secret to my success? Bags that can fit 3 blanket into the space of one, baskets whose interior dimensions are greater than their exterior dimensions, or hiding everything under the bed? No! I also didn't spend any money on clever organizational gizmos, or new baskets, or magical vacuum bags. In fact, I didn't spend any money at all. So how did I do it?

I got rid of stuff. A lot of stuff. 3 garbage bags full of stuff. I mercilessly purged all of those items I did not love, or could not think of a purpose for. The small bits of fabric, too small to even make a napkin, suffered the worse. I put them all in a pile, and told my kids to give me those that they would like doll clothes made from (the only thing I routinely use small pieces of fabric for). The rest went in the trash (sorry quilters).

20130403-131611.jpg

My left over bits of yarn went in a basket my kids can reach so they can access them. They will now be easily accessed for kids projects, wrapping and tying things, and knitting experiments.

20130403-131831.jpg

The left over bits of fabric, and squares large enough for napkins (but not much else) are now in a drawer of their own.

20130403-132001.jpg

And my interfacing, stuffing, and dye have their own space now too.

I have to admit that I was scared to get rid of my stash at first. After all, it could be used to make something. And I love to make things. But now that it is over I feel a huge sense of relief. I am now left with those things I actually WANT to make into something, and I no longer have an insurmountable mountain of stuff bearing down on me waiting to be worked on.

I encourage all of you to turn a critical eye on your stash, be it big or small, and cut out the chaff. I think you will be glad once you have done it.

The Power of Less - Craft Studio

I have been reducing the clutter in my house, and sharing the results with you in my power of less series. I will finish off national craft month, with crafty decluttering.

For me, having no space to craft is the most discouraging barricade to crafting. When my craft "studio" is a mess, nothing gets done until the clutter is cleared.

This decluttering was simply reestablishing my pre existing organizational system, rather than an overhaul of that system. I'm pretty happy with the results.

Top 3 Crafty Podcasts

As national craft month comes quickly to a close, I thought it would be a good time to share some of my favorite crafty podcasts. DIY

3) Destination DIY Destination DIY is a independently produced radio show from Oregon, US that is also released as a podcast. It tackles a variety of crafty topics, from maker fair to crafting disasters. The professional quality of this podcast makes it a joy to listen to. Unfortunately it is not produced very often.

imake

2) iMake iMake is a multi-craft podcast from Guernsey, an island dependency of the UK. It usually consists of a craft segment, and a segment about Guernsey itself. My favorite thing about this podcast is the range of crafts it covers, some of which I had not heard previous to this podcast.

Electric Sheep

1) Electric Sheep Electric Sheep is a knitting podcast, featuring pattern reviews, knitting essays, a ninja sheep, Molotov chickens, and beards. This smart and funny podcast from London, England, is the only crafty podcast that Fire Beard has ever willingly listened to, even the kids like the yearly audio panto at Christmas Time.

In celebration of national craft month check out some of these entertaining crafty podcasts!

The Small Shoulder Adjustment

As I said in my previous post, while working on the Taffy blouse from Colette Patterns I became a bit disenchanted with the Full Bust Adjustment, and decided to try the small shoulder adjustment instead. It worked beautifully, and now I am ready to share with you the method and the results. I began by copying the front and back bodice pieces that corresponded to my full bust measurement. On the copy I also traced the upper portion of the pattern size corresponding to my high bust measurement. At the bottom of the armscye, I blended the smaller shoulder into the larger side seam. This new line was my new armscye.

If the length of the new armscye was more than 1.5 inches bigger than the sleeve, then the sleeve cap would have to be adjusted to compensate for the new size of the armsyce as well. Fortunately, that was not the case with this sleeve cap, and no adjustments had to be made. Frankly the idea of adjusting the sleeve cap of this bizarrely shaped sleeve is the stuff of nightmares, and I thanked God that it didn't have to be adjusted.

The initial tissue fitting indicated that I was pretty close to a great fit, and a muslin indicated that it was nearly perfect. Here is the result.

dsc_0198

dsc_0198

I think that a comparison of the FBA adjustment and the small shoulder adjustment makes the difference in fit pretty apparent. The armsyce is really distorted after the large FBA, but looks pretty normal after the small shoulder adjustment.

dsc_0201

dsc_0201

Like nearly all pattern adjustments the small shoulder adjustment can be done in more than one way. My way, is simply that, my way. It is not necessarily the best way, or the "correct" way, but it is what worked for me, and I will continue using it, until I find something that works better.

Full Bust Adjustment vs. Small Shoulder Adjustment

Most sewing patterns base the measurements of their sizes on an imaginary ideal person. Her bust is a B cup, her full bust measurement is equal to her hip measurement, and her waist is 10 inches smaller than her full bust or hip. It is usually recommended that those sewers whose bust is larger than a b cup adjust their pattern using a full bust adjustment to accommodate their larger busts. For those people whose busts are larger than a B cup, and their full busts are larger than their hips, I highly recommend this adjustment. But what about those, like me, whose busts are larger than a B cup, but the same size as their hips? For many of these people (including me), a full bust adjustment would have to be followed by a full hip adjustment for the garment to fit the entire body.

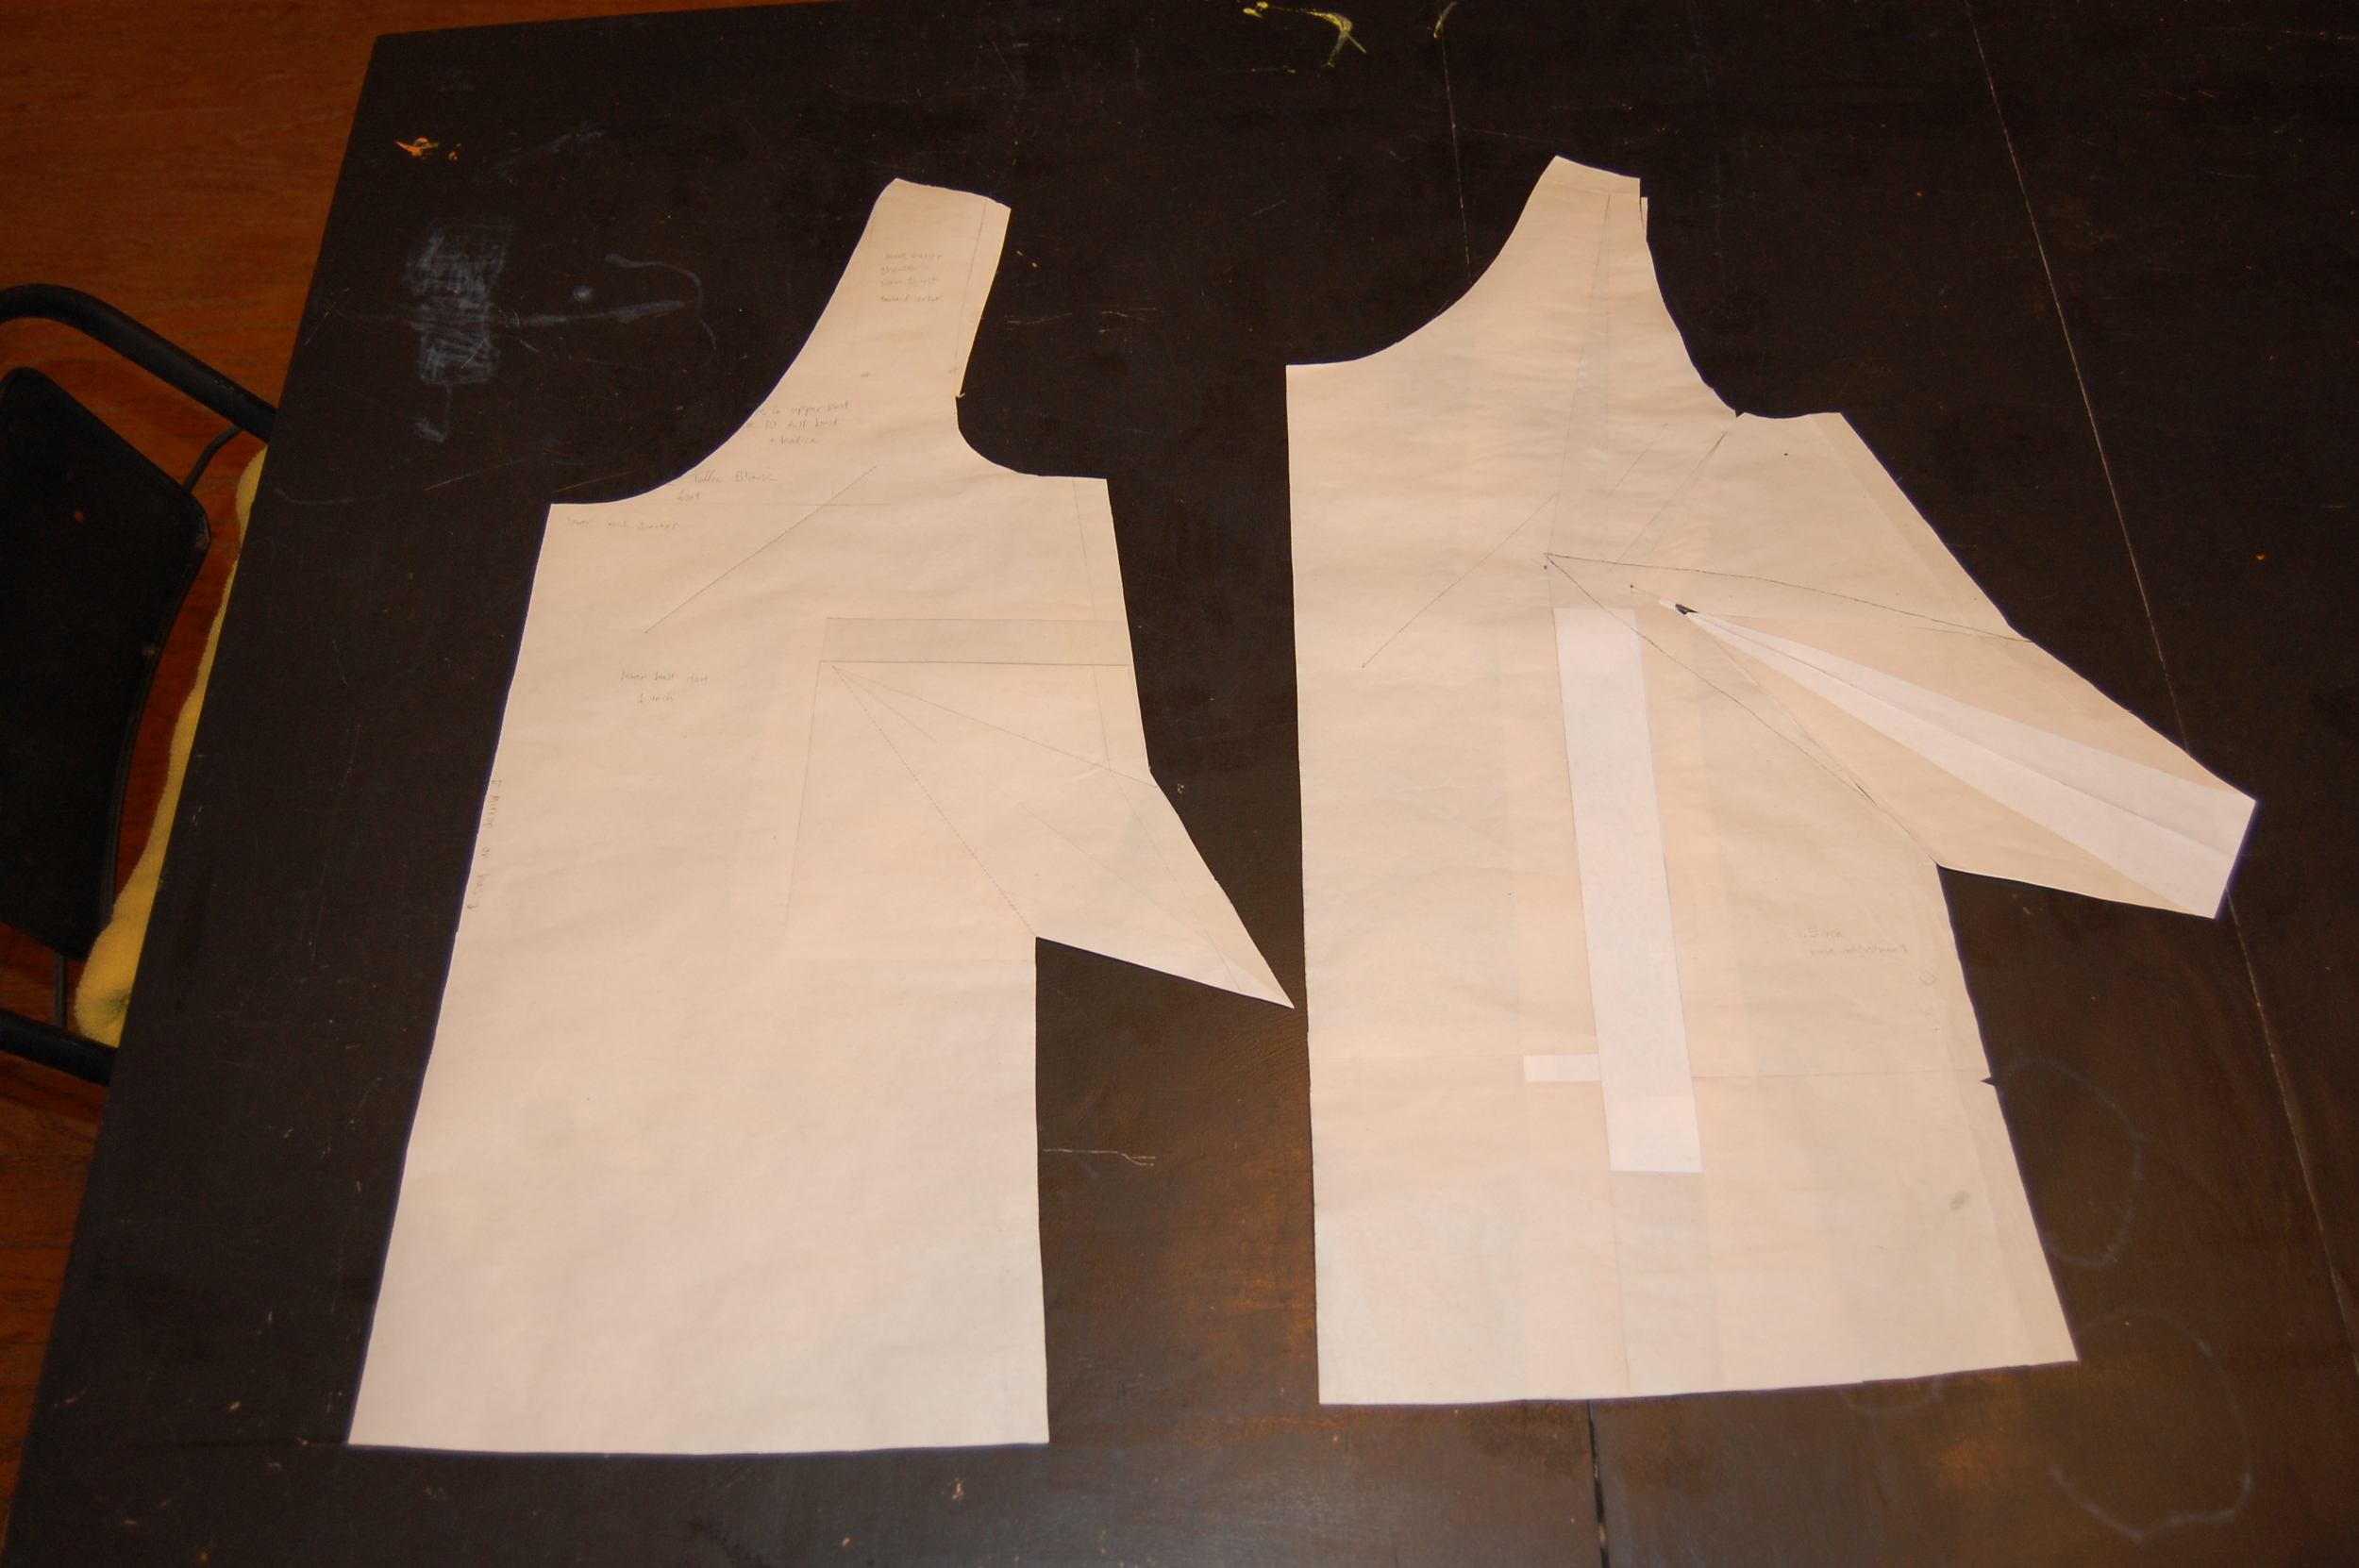
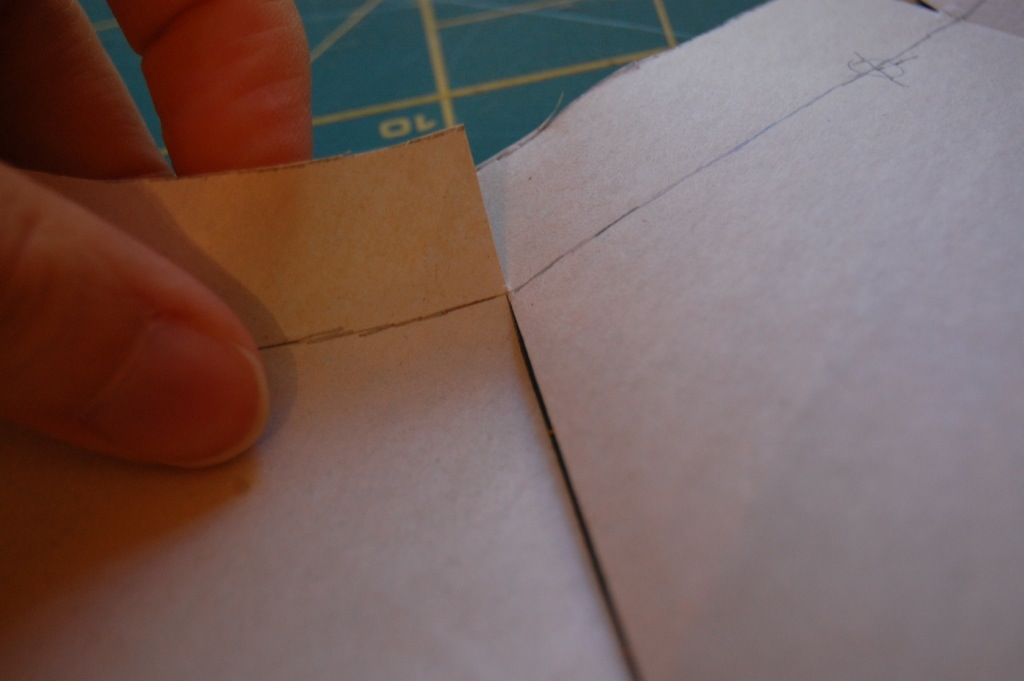
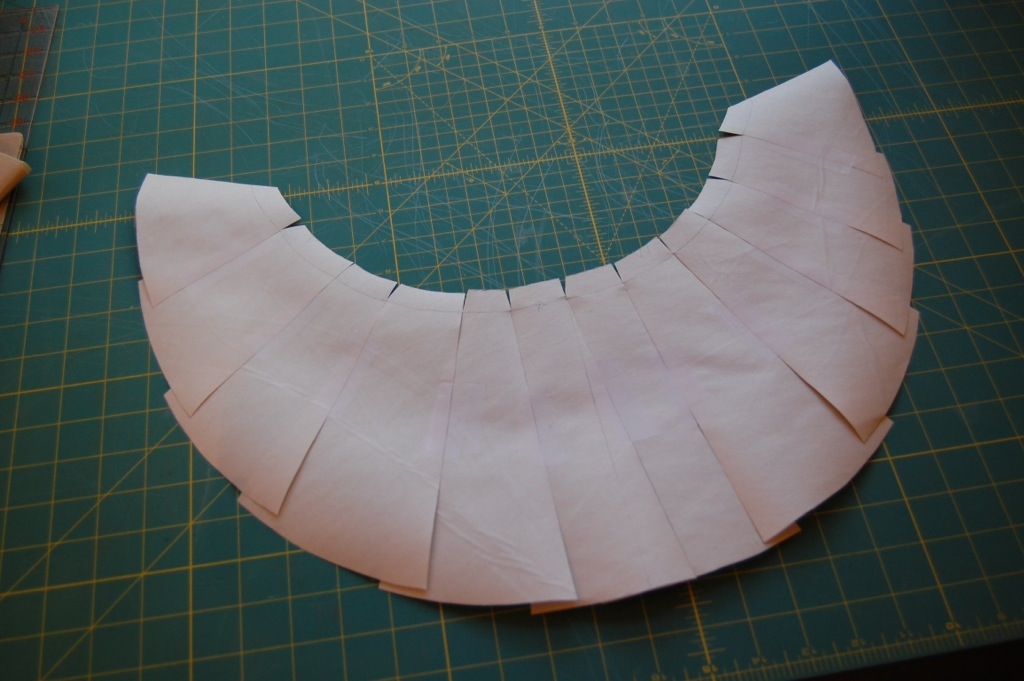
I have, as generally recommended, adjusted the bust and then the hip, with mediocre results. After hours of pains taking adjustments, I usually end up with a mangled pattern that is more tape than paper, and the proportions always seem a bit off even through my bust and hip are proportionate. I decided there had to be a better way, and began experimenting with small shoulder adjustments instead.

The problem for those with cup sizes larger than B (and nothing else is larger), is that, if the pattern size is determined by the full bust measurement, the garment will be too large in every place but the bust. What I realized, is that my hips and waist are proportionate to my full bust measurement. The only part of my body that is small in relation to my full bust is my shoulders. So, why should I pick a pattern size based on my upper bust (basically my shoulders) and adjust everywhere else, when I can pick the size based on my full bust, and only adjust the shoulders?

I believe the reason the full bust adjustment is generally recommended is that it is considered easier than the small shoulder adjustment. After all, the small shoulder adjustment involves the armscye, and adjusting the armscye is scary for most.

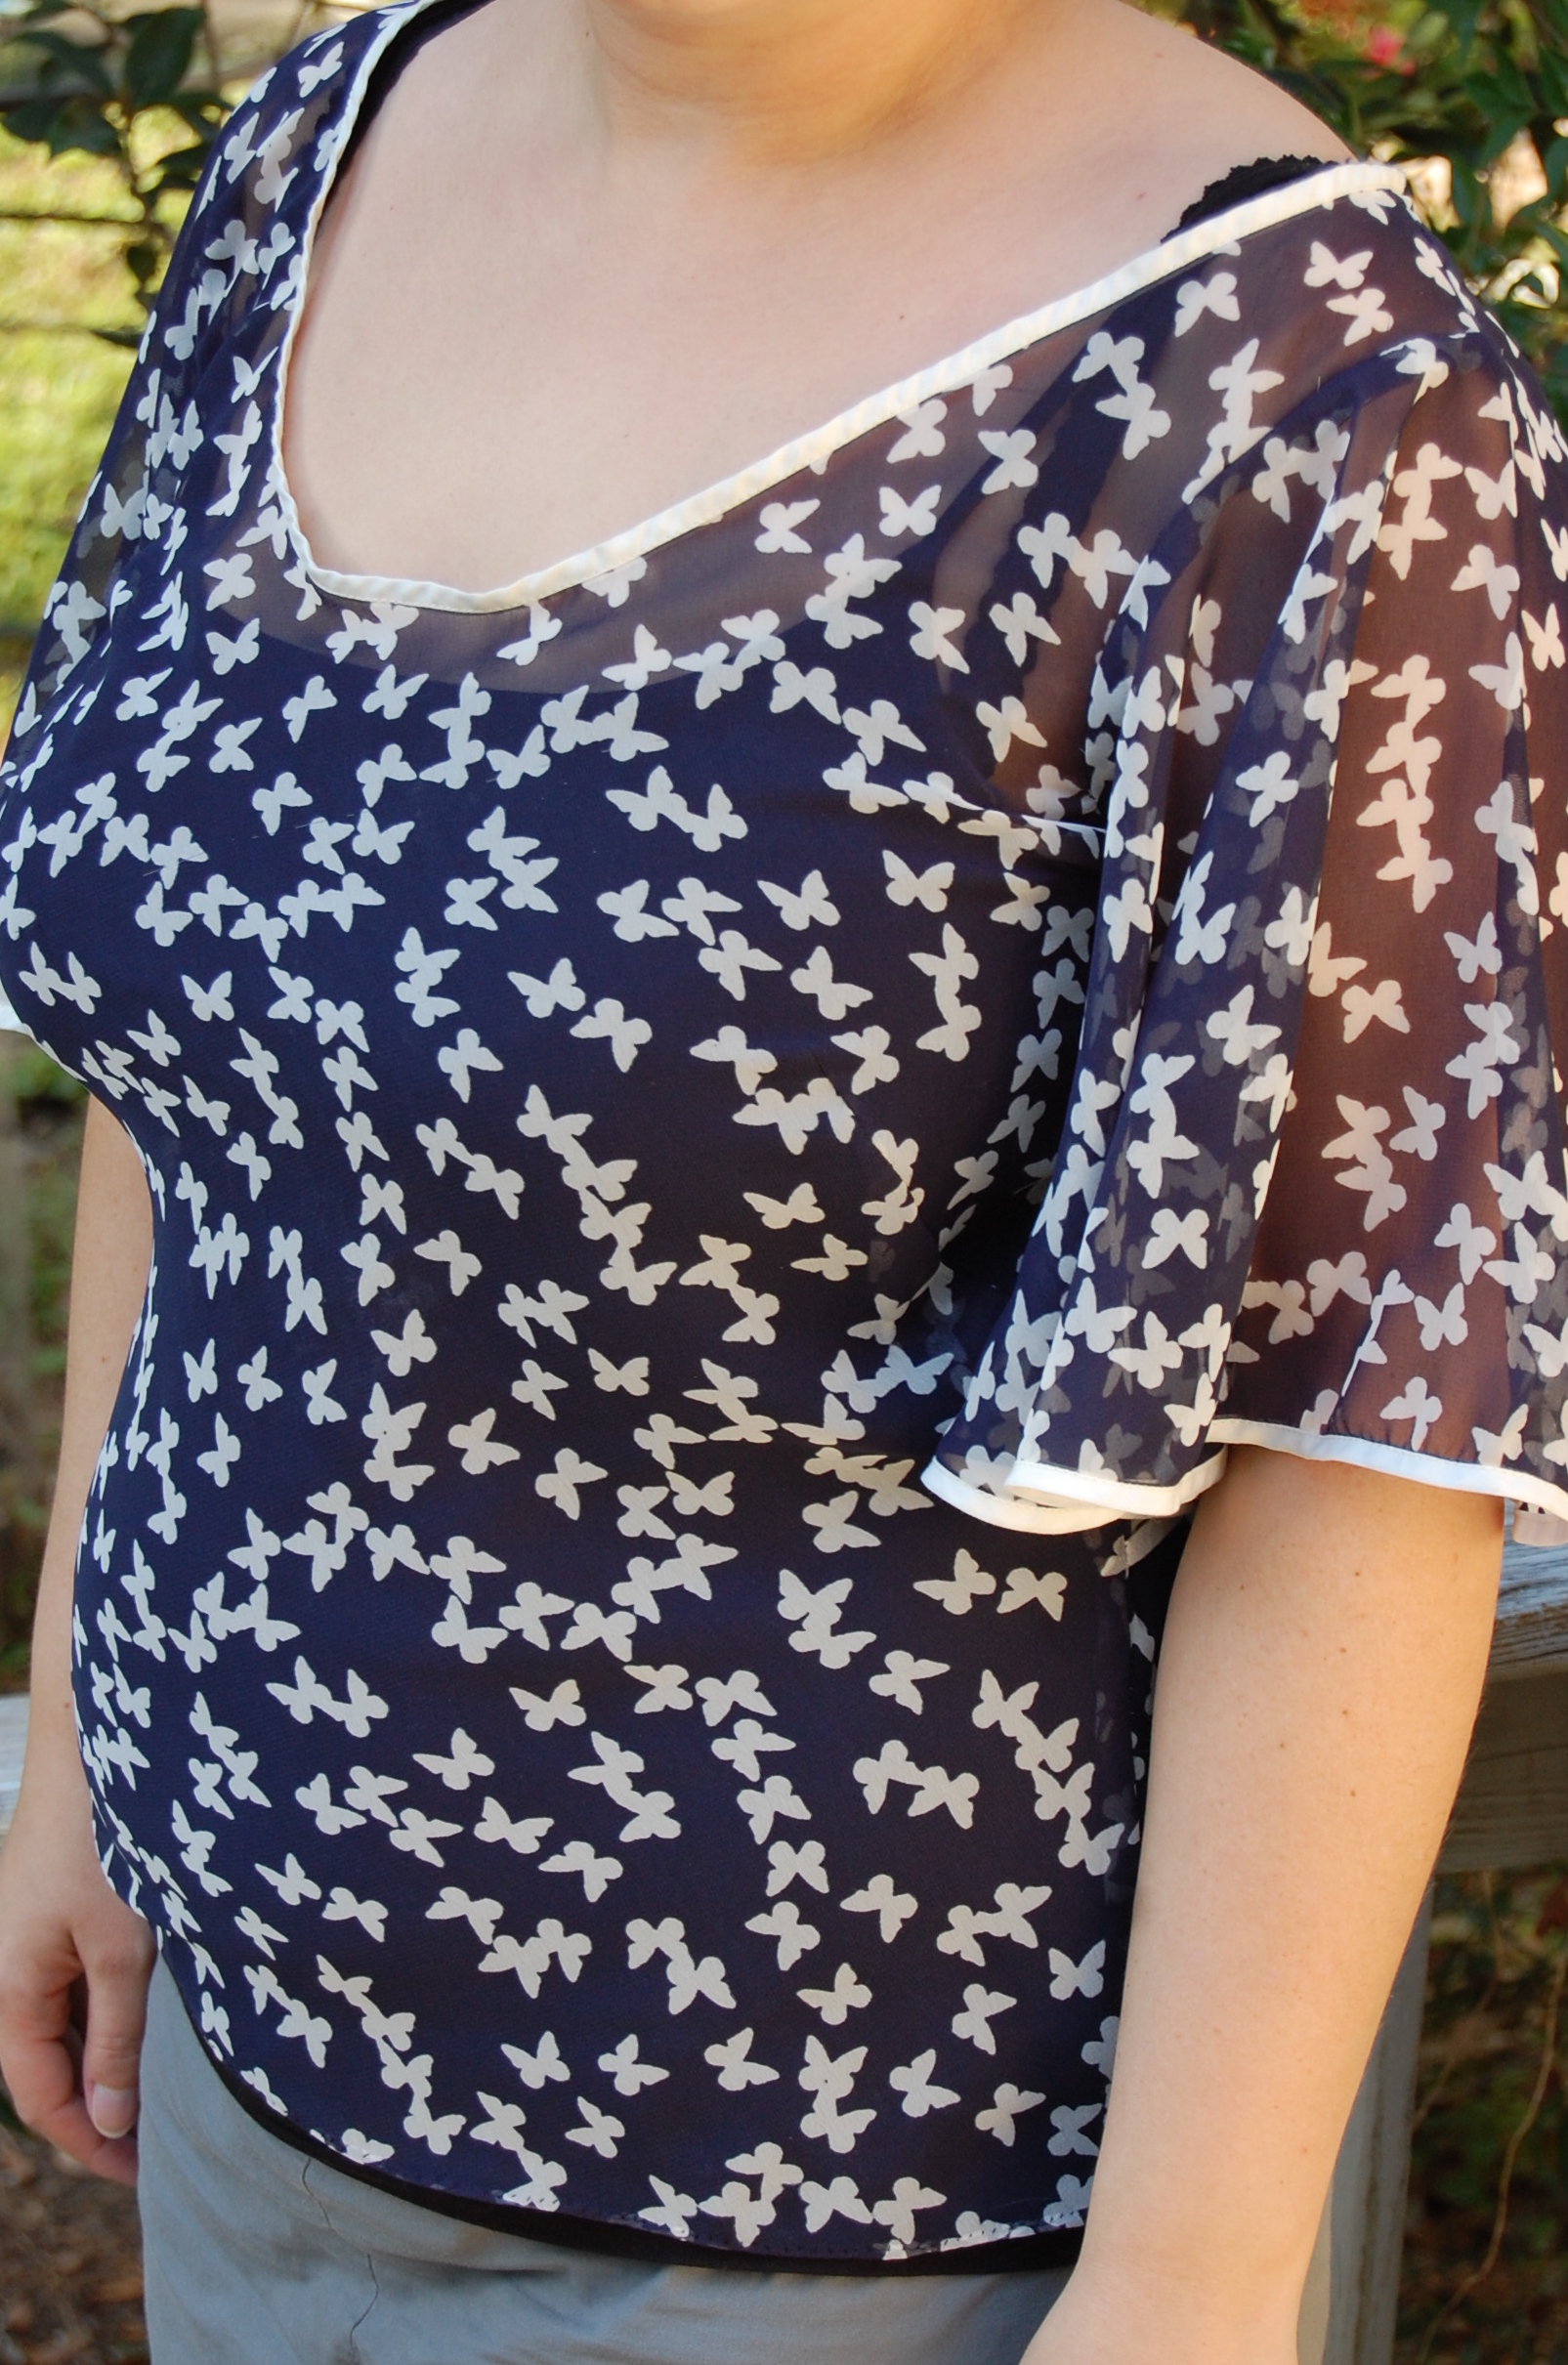
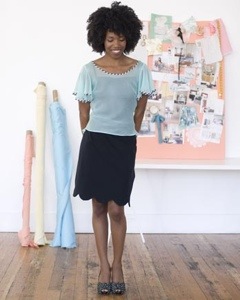
After doing an FBA and making a muslin I was not happy. The blouse hung strangely, still didn't fit that well. I decided to start over and do the small shoulder adjustment instead. After making the muslin using this new adjustment, I knew I was on to something. I did a few more tweaks, the made the final garment.

I am pretty happy with the results (although I would adjust it a bit more if I made it again), and I am using this technique again in the garment I am currently making. Details to follow.

Colette Taffy Blouse - Adapting the Sleeves

The Taffy Blouse, from The Colette Sewing Handbook.

My latest crafty endeavor is the Colette Taffy Blouse, which, given my limited crafty time and exacting standards, took me over a month to complete. While I will try to cover a few of the reasons it took me so long over several posts, today I will only be covering the sleeves.

The Sleeves of the Colette Taffy Blouse are, as you can see, quite voluminous. While they are very pretty, frankly, they are a bit much for my taste. So I decided to make the full circle sleeves half circles. I will show the the first step in that process today.

First I traced the original full circle pattern piece. I trace all of my pattern pieces before I make any adjustments so that I can go back to the original if I make any mistakes and so I can make a different size in the future.

I started to adjust the pattern by making evenly spaced cuts through the sleeve, up to but not through the seam line. I mirrored these cuts in the seam allowance, again, not cutting through the seam line. Keeping the seam line intact keeps the armscye intact, so that the armscye on the blouse portion of the pattern doesn't have to be adjusted as well.

Then I overlapped my cuts evenly and taped them in place.

It is worth noting at this point that I could have also simply cut a large wedge shape from the center of the sleeve and taped the exposed ends back together. The reason I didn't do this is that the sleeve ins't a perfect circle, and while taking a piece out of the middle would have reduced it's bulk, it would also change it's shape. Reducing the sleeve evenly around it's circumference better retains it's shape.

When finished, the pattern looked something like this.

In the final version I further decreased the bulk of the sleeve and extended it's length by several inches.

Food Craft - Cake

March is National Craft Month, so I would like to start the month with a craft, food craft. This last weekend was my son's birthday, and he and my MIL created a cake of his design, a Angry Birds/Lego Star Wars Ice Planet Hoth Cake. It was adorable and he loved it.

The base was made from marshmallows, piled together like an igloo. Thick white frosting created a blanket of snow, and large pieces of sugar made it shine. Toothpicks were stuck into the lego pieces which were stuck into the cake, allowing them to hover just above the sticky "snow".

My son created the snow speeder crash landing into the enemy, and my daughter created the rebel flag.

The Power of Less - Spice Cabinet

20130222-122412.jpg

20130222-122412.jpg

In keeping with the theme of un-cluttering my clean on the outside, awful on the inside kitchen, this past weekend I tackled my spice cabinet.

Thing 1 and I started by taking everything out, including the shelves. We washed everything, even the spice bottles themselves. Then we started sorting. We threw out old spices, and merged duplicates. They were grouped by their type and use. The result was far less clutter, and easy access to the most used bottles.

Time: About 2 hours. Cost: $0