Is your e-mail on Autopilot?

If you have not checked out Cadie yet, you should.  G-mail can now read your e-mail for you and respond just like you!  What a great time saver. Okay, obviously this is a joke.  I will admit that I thought google had been hilarously hacked at first, then I realized that it is April 1st, and the wonderful people at google actually have a sense of humor.

I don't want to be rich....


for sale
Originally uploaded by netan

... or famous. I don't want to have a big house or a fancy car, or enough debt to drown in.

I want to feel secure in the knowledge that I can pay my modest bills, put food on the table, and set a little bit of money aside for saving. I want to be known in my little circle of friends as a fine person, and leave a legacy of doing good. I want a reliable, inexpensive car that is not so ugly that my kid's are embarrassed by it, and I want to leave my kids something that does not include debt.

Most of all, at the moment, I want a little house, that we can easily pay for, and call our own.

My husband and I are going to look at a house today, with an eye for possibly buying it. It is old, small, neglected, and cheap. I am hoping that we find it suitable to our needs, and structurally sound. I am hoping that I like it, and would like to live in it, and that soon we will again have a place of our own.

We shall see.

WIP - Blued Steel Socks

Lately it has seemed that our family has been on the express train to crazy town.  We have been working or planning to work, from 7:00 a.m. to 10:00 p.m. nearly every day.  Today however, I have a little time to relax and knit.  I have no projects that need to be finished by a deadline, and other than a little house cleaning (not a small feat with two toddlers, I will admit), I have nothing that needs to be done immediately.  Can you hear my sigh of relief? So today I will try to finish the heels of my husband's sock's, which I have failed to mention on this blog so far.  I did not mention thes socks, because I decided to try a new technique while knitting them, and was afraid they would be a disaster.

I am not much of a sock knitter.  It is not that I dislike knitting socks, rather, I prefer knitting other things, like sweaters.  I also have a SERIOUSLY BAD case of 2nd sock syndrome.  Even after the first sock has been completely knit, the 2nd has a good chance of never being made.

I made the previous mistake of knitting my huge footed husband a pair of socks, and those of you who have ever worn a pair of handknit socks know, that once you have gone handknit you never go back.  He has since been asking for a 2nd pair of socks, and eventually I reluctantlyagreed.  Knowing my reluctance to start a 2nd sock, and not wanting my husband walking around in just one sock, I decided to try to knit both socks at once.

I used the magic loop technique (also new to me) to knit both socks on only one extremly long needle.  I was suprised to find that after finishing the figure 8 cast on, the technique was straight forward and easy.  On top of that, knitting both socks at the same timedoesn't seem to take much longer than knitting one sock on dpn's.  I throughly enjoy knitting in this fashion, and may knit ALL future socks in this manner.

Here is how it is going so far;

The Socks

Cascade Heritage Hand Painted Sock Yarn in Color 9922

Pattern: Universal Toe-up Sock Pattern

Yarn:  1 Skein Cascade Heritage Hand Painted

Needles:  Size 2, 45" circulars

Yes, I am knitting both socks at the same time from one skein.  I will show you my method later.

Beautiful Spring Day (pic heavy)

I will admit that I perfer Fall to Spring, because Spring means that the heat is just around the corner.  However, Spring Days like this make me forget my bias toward Fall.  Spring here is beautiful! Taking a Dog for a Walk

Beautiful Weeds


Among the Bradford Pear Blossoms


Azeleas


Iris

Swinging


Wisteria

Yellow Iris


Tea Olive.

This diminutive little blossom is, in my opinion, the most wonderful smelling flower in the world.

Knitty, Spring 2009

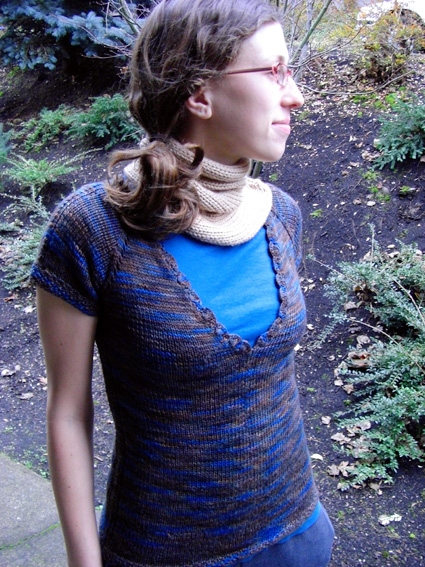
  Pioneer Pullover

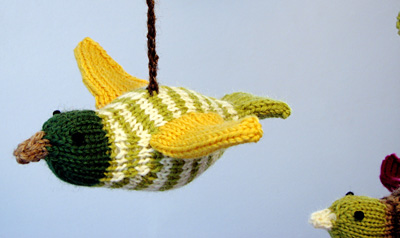
Knitty's Spring 2009 edition is now on-line.  As always they have a variety of cute, beautiful, and interesting patterns.  I especially like the flock mobile, and Pioneer Pullover.  The mobile would make a beautiful baby present, and the pullover is one of the few patterns that show off the beauty of hand painted yarn.

Check it out!

Embroider my Liver

I have been dying to post about this embroidery project for the longest time.  This project was a Christmas present, that was finished before Christmas, but was not given until this past weekend.  One of my good friends who is currently living in Maine came this past weekend to attend my Son's birthday party (details to follow), and he finally received all of his gifts.

He was the previous recipent of the embroidered heart, and upon his enthusiastic receipt of the heart I enquired what his favorite organ was.  He responded the liver.  The above pictured liver and surrounding organs was the result.  

Here are some detailed shots;


Pancreas and Duodenum

The Pancreas is the light peach organ pictured above.  I used french knots to create the oddly bumpy texture seen in a real pancreas.


Spleen

The spleen was made with bullion knots, to imitate the the lumpy texture of a real spleen.


You may see more anatomy embroidery in he future, as it was  indicated that a series would be appreciated.

KReATIV Blogger Award

Tasha at I'm only fooling myself was kind enough to give me the Kreativ Blogger Award earlier this week.  Thank You Tasha!  I feel really honored by this award, because blogs that do not have huge readerships, like mine, are often over looked when it comes time to give an award.  It is wonderful to know that ones work is appreciated and acknowledged.

The rules of the Kreativ Blogger Award are thus;

List 7 things that you love and then pass the award on to 7 people…tagging them and letting them know they won! You can copy the picture of the award and put it on your sideboard letting the whole wide world know you are KReATIV!

Seven things I love:

1)  My Husband.  He works hard, rarely complains, puts up with my eccentricities, and loves me even when I don't deserve it. 2)  My Kids.  My kids are a part of me, both literally and metaphysically.  I love them in a way I never thought possible before they came into my life. 3)  My sister.  My sister is one of the few people whom I can be away from for a long time, and when we come back together it is as if no time has past whatsoever.  It is a very comfortable feeling. 4)  My dog Surly.  I think the love of a pet is nearly unconditional.  I know that my dog will ALWAYS be there for me. 5)  The wonders of the natural world.  It is more beautiful than man could ever make. 6)  Literature.  It is poetic, insightful, inspireing, fun, imaginative, creative, enlightening, educational, and probably the most convinceing arguement for civilzation in my opinion. 7)  I love Making!  I don't care what it is (although I do have preferences), as long as I can transform it into something beautiful, or useful, or both.

Seven blogs I love:

Gadabout Knitter Abozzo Absy's knitting Laupre (Insert Clever Title) sew i do Bunny Cakes

More FO's

Perhaps it is because Spring is on it's way, or because there are no more babies in our future, but I have been on a making frenzy.  A few projects have built up that I have not had the time to post, and instead of letting them linger, I thought I would post them all at one time.  Here goes......  

SILs Earrings

Pattern: Bijouterie Earrings by Rosemary Hill Needles:  US 2, 2.75mm straights "Yarn":  32 gauge silver beading wire (knit double)

Started:  February 28, 2009 Finished:  February 28, 2009

These super quick earrings were knit up for my SIL's birthday.


My Daughters Mouse Pad

My daughter requested a mouse pad, after seeing the one I made for myself.  This smaller version was made for use with her "computer."


My Sons Apron

This is an old project that I forgot to post about.  The pattern is my own, so let me know if you are interested in making it.  I have most of the pictures necessary for a tutorial.

Last, but not least;


Clothes for Samantha


My daughter just inherited my old Samantha doll.  She asked for some new clothes, and these were the result.  I made my daughter some pants to match the dolls skirt, but she wants a skirt, like the doll's.  The skirt is basically a large rectangle with an elastic waist band, and the shirt's pattern came from this website.

Done for now!

FO - Mail Sorter

Blogger London Purple has a wonderful tutorial on making your own Fabric Mail Sorter.  I have been needing something like this for a while, and jumped at the opportunity to make it.  

My Version of the Mail Sorter

I modified the pattern slightly (as always ), but not in any meaningful way.  I simply removed the bulk from some of the pieces to make the sewing up easier on my very old machine.  If you need to know how I did this, comment, and I will reply.

If you have been keeping up with this blog, you can see that the same fabric has been used in the past several posts.  This is an attempt to visually unify my craft area.  I will show you all the outcome when it is finished.

FO - Pin Cushion Caddy

Craft Magazine recently posted the Pin Cushion Caddy pattern from Anna Maria Horner's new Book Seams to Me.  As soon as I saw it, I knew I had to make it.  Here it is;  

My version of the Pin Cushion Caddy

I love how it turned out, even though it is not exactly how the FO looked in the pattern.  I found after extensive ripping, measuring, and remeasuring, that the pattern did not correctly state the seam allowances for the exterior of the caddy, and as there are 8 pieces to the exterior, even slight seam allowance problems mean big problems.  I finally remedied the problem by using the stated allowance in half the seams, and 5/8" in half the seams, alternating the allowances as I went.  The suggested interfacing was not adequate either.  I ended up sing actual cardboard!  

Still, I LOVE  the outcome, and the pattern was free.  I plan to check out the rest of the book soon.  Amazon has a few pictures from inside the book, and another free project.

FO - Mouse Pad

Sew Mama Sew, an on-line fabric store with a terrific blog is doing a month of fat quarter projects.  These are projects that can be made with fabric pieces that are about 18" by 20" or smaller.  These are great ways to use small amount of expensive fabric, leftover fabric, or salvaged fabric.

They rencently posted a tutorial on making mouse pads with fat quarters.  I was reading this tutorial with my son on my lap, trying to keep him from banging the mouse against my bare desktop, and inspiration struck.

I decided to use a small piece of my favorite fabric I salvaged a few years ago from a pair of pillows.  I think the project turned out beautifully.

I did not directly follow the tutorials presented on Sew Mama Sew, and instead used them as inspiration for my own version.

First I bought a super cheap mouse pad.  It was about $3 at Office Depot.  I would have preferred to use an old mouse pad, but none were available.  I then attached one side of some double sided fusible interfacing to my fabric, and traced the outline of the mouse pad on the paper backing of the interfacing.  I cut out the fabric and interfacing, peeled off the paper backing on the interfacing, and attached the mouse pad by matching the edges.  I pressed the mouse pad on the fabric side with a damp cloth on top to produce steam and dissipate heat.  I then placed the mouse pad under some heavy books until it cooled (to keep it from curling).  When it was finished cooling I applied several coats of mod podge to protect the surface of the pad, and keep the edges from fraying.

The result inspired me to use this fabric as the inspiration for my craft area's color scheme, so you will probably be seeing more of it soon.

Monogrammed Napkin Tutorial

These pretty monogrammed napkins were a last minute Christmas gift for Mr. Incredible's grandparents.  I needed a quick present, but I wanted it to be nice too.  These napkins took less than 1 hour to make, with the exclusion of washing and drying the napkins.

How To
Materials:
Napkins, I used Iris Napkins from Ikea ($1.99 per 4)
A picture you want to put on the napkins
Iron-on transfer paper
A computer and printer
Iron
Process:
1.  Wash and dry your napkins as per their washing instructions to remove any chemicals present on the napkins.
2.  Create or find your picture.  I used photoshop to modify a font that suited my purposes.
3.  Using regular paper test print your picture, using all of the settings you plan to use in the final printing.  Make sure this test printing is the correct size and color, and is printed in a mirror image if your picture needs to be read.
4.  If necessary modify your picture and test print again, until the picture is perfect.
5.  Print your final image on iron-on transfer paper.
6.  Cut out your picture.  I use an exacto knife, and cut out all of the unprinted areas, leaving a small border on all sides.
6.  Then transfer your image based on the packages instructions.  Make sure your iron setting is not too high for your fabric.
Enjoy!

Mounted "Butterflies"

My Mother wants to collect mounted butterflies.  I find the idea of killing an animal to put it on your wall highly disturbing.  But thanks to Craft magazine, I found a middle ground in time for my Mother's birthday.

I used a Martha Stewart Punch to make the butterfly shapes out of a picture my daughter made with children's picture making software.  The butterflies are mounted on black construction paper (recycled from the kid's art projects) with foam adhesive.

The Peels

I told you I would let you all know what I did with the peels left over after making lemonade, and I have not forgotten.  I did, however, fail to mention that did not make just one pitcher of lemonade.  I actually made 3 rather tart pitchers of lemonade, leaving me with a LOT of lemon peels.

There are tons of things you can do with lemon peels, but I dried most of mine.

First I separated the peel from the pulp of the lemon, by running a small sharp knife around the white pith of the lemon.  The pulp can then be pulled from the peel.


Seoerateing the Peel

The pulp was then composted.


Pulp Awaiting Compost

Once the pulp was separated from all of the peels, the peels were set in the dehydrator.  An oven set on low or warm would also have worked, as would a warm, low humidity day or two.


Wet Peels in Dehydrator.

I let the peels dry over night.  The next morning, they looked like this.


Dry Peels

What can you do with a bunch of dried lemon peels?

  • Make a potpourri with the peels, cinnamon sticks and cloves.  Set in a pan of water over low heat.
  • Throw into a burning fire for an infusion of fresh lemony scent.  
  • Add them to your recipe for apple cider or mulled wine.
  • Grate into tiny pieces and to soap as an exfoliante.
  • Include in an herbal sachet.
  • Decorate a citrus/lemon scented candle.
  • etc.

I also picked a few of the most perfect peels to make zest.

You have to get ALL of the pith (white part) off the lemon peel if you are going to make zest with it.  

First cut around the pith as close to the yellow zest as possible, and pull off all of the loosened pith.


Removing the Pith

Then CAREFULLY scrape off any remaining pith.


Scrape off Remaining Pith

You should be left with nearly translucent zest.  It is difficult to see in the picture, but my fingers are visible through the remaining zest.


The Zest

The zest can be used to add an intense lemony flavor to your favorite foods.  I will probably be using mine in some lemon cream scones! Yum!

Baking Bread

I love Harry Potter, and I am constantly finding ways in which the book mirrors reality (I know, I'm a dork).  The instances in which my life mirrors the book are few and far between. Believe it or not, for me, baking bread is one of those instances in which I feel like I am living the fantasy.  Some how, during mysterious alchemical processes (or perfectly understandable chemical reactions which I chose to ignore), water, flour, yeast, and a few other simple ingredients combine to make bread.

So today in potions......bread.


Doesn't that seem like magic?

The Calm after Battle.

It has been a harrowing few weeks for my family, hence the silence.  Two weeks ago I had a minor surgery that had me laid up for a few days.  Then last week my husband's dog attacked my dog.  Had I not been there, I doubt my dog would have survived the attack.  I am now fully recovered, but I cannot say the same for my dog. My dog has been with me for about 6 years now.  I adopted him from the animal shelter when he was a starved little puppy.  When I got him home I nursed him back to health, and he has been a wonderful loving dog ever since.  He is even highly tolerant of my children dressing him up and loving him to death.


My daughter and dog as a mighty knight and Eggbert the dragon.

My husband's dog came to us about a year and a half ago.  Someone my husband was working with picked him up off the interstate, and my husband, hearing the dog's story and knowing that the animal shelter was euthanizing every pit bull that crossed their door, took the dog home.  He initially intended to find the dog a new home, but upon taking him to the vet and finding he had heart worms, we decided to keep the dog during his treatment.  Well during that time we became attached to the dog, and decided to keep him.


The dog, soon after being treated for heartworms.

He was a very loving dog, that was exceptionally gentle with my kids.  He was also a fully intact male, something we don't allow in our house.  After the heart worms were gone we took him to be neutered.  The surgery went well, but soon after the dog began developing a skin rash.

We have since taken the dog to several vets, and even a canine dermatologist.  None have been able to tell us what is wrong with the dog or give him more than temporary relief.  Still, despite the skin condition, he had been a wonderful dog till about 2 months ago.  That is when the first attacked occurred.

The first attacked was unprovoked and quickly stopped, but my dog came out of it with several puncture wounds, and a torn ear.  It also left me with the lasting impression that the dog was unstable, and potentially dangerous.  I believed that his skin condition had finally made him so miserable that even the slightest provocation could set him off.

Fast forward to last week.  My kids, my MiL, and I were playing in the yard with the kids, when my husband's dog again attacked my dog unprovoked.  My husband, who is a large man, had been able to stop the last fight with little difficultly, but he was not around this time.  I beat the dog with a metal pole that was in my garden.  I beat him until my hands were bloody, but still he would not stop attacking.  He had my dog's entire neck in his jaws, and I could hear my dog gasping for air.  Finally, I jammed the pole in the dog's mouth and wrenched it open.  Fortunately my MiL was there to help me pull the dog off, as he was not finished attacking. 

The outcome was the best that could have possibly occurred.  My husband's dog bit my own on the collars, and my dog ended up with only minor puncture wounds on his neck.  One leg had wounds numbering in the teens, but with care and antibiotics it is doing well now.  

My husband's dog is no longer allowed around my dog or my children, and we are at the moment trying to decide what should be done with him.  We have talked to a dog trainer in town that has little hope for him, and are in contact with a dog rehabilitation center, but his outlook looks bleak.

Sticking it to the Man - Making Necessities

In this economy many of us are looking for ways to reduce our expenses, but there comes a point when we can no longer cut out the extras.  Once we have cut out extraneous spending, we can shop sales, and buy cheaper products, but it is very difficult to further reduce spending in a meaningful way.  Necessities keep our bills at a constant level of expense.  We can't simply stop using them, as by definition they are necessary, however, we may be able to stop buying them. Below are links to products that those in the Western world often feel are necessary parts of their daily lives.  The links describe how to make these products for pennies per application AND without all of the harsh chemicals present in their commercial counterparts.  Just imagine, living a lifestyle of increased environmental responsibility while spending less.

Homemade Deodorant

Living Shampoo Free  Cleaning your hair without stripping it of it's natural oils, to create healthier hair and scalp

Toothpaste Recipe 

Synthetic Free Moisturizer A multi use moisturizer with only one ingredient

Homemade Laundry Soap/Detergent

Other Household Cleansers All purpose cleansers, window cleaner, mild abrasives, etc.

Soap Nuts Nuts that contain a natural soap like ingredient that can be used for multiple cleaning tasks

Homemade Dish Washing Detergent

My Own Formula for All Purpose Cleaner;

Add 1 tsp natural soap to 1 cup warm water.  Mix and spray on surfaces to be cleaned.  Wipe thoroughly.  As always test this cleaner on an inconspicuous spot before using it.

~Gerwerken