DIY Countertop Refinishing
/Regular Readers know that so far our mini bathroom remodel has not been as mini as we had anticipated. Things have cost more than we planned, taken longer than we planned, or just not gone to plan. But the way our bathroom countertop looks now makes me feel like it was all worthwhile. It was the kind of project that I need every once in a while to restore my faith in DIY – a quick win.
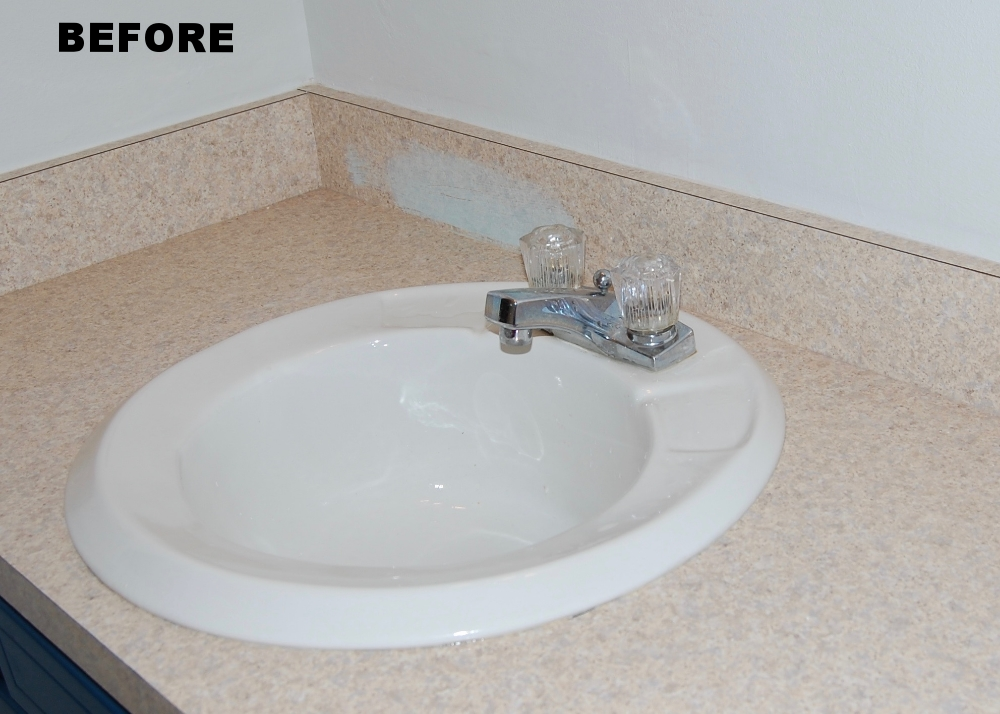
Before - Unattractive Laminate
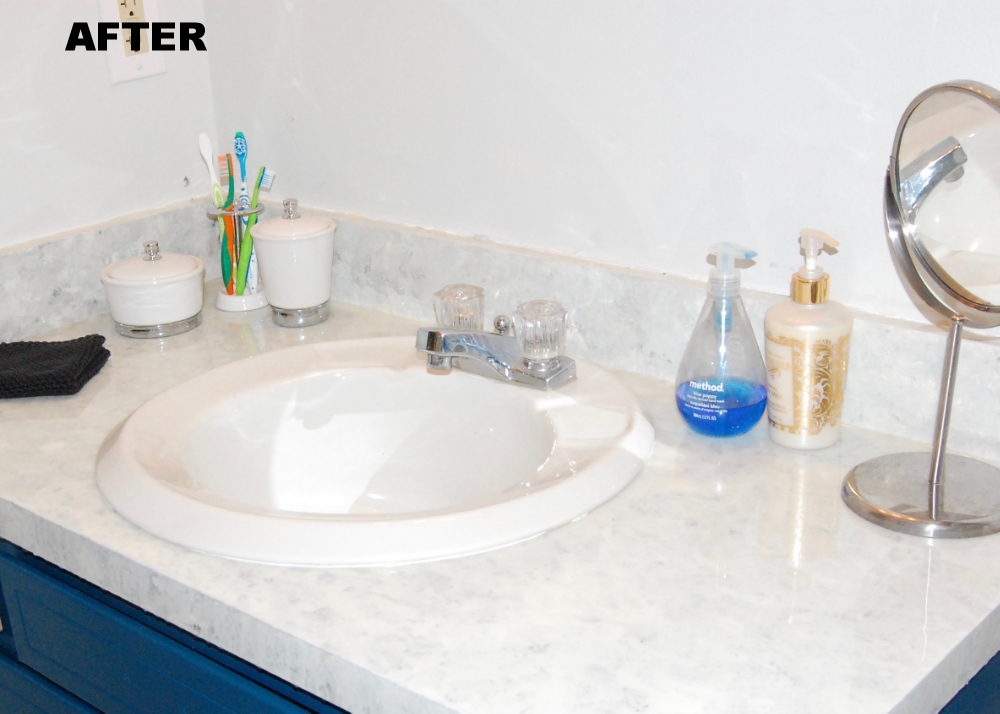
After - my Mom Thought we installed marble
I really am incredibly happy with our new bathroom countertop, and really excited to share it with you all, so let’s get started, by taking it from the beginning;
One of the things that I knew I wanted to do when we started this mini bathroom remodel was update the countertop. The old countertop was a sandy colored laminate. It was in good shape, but it added nothing to the space. Initially I had visions of granite and marble dancing in my head, but a limited budget put the cabash on that pretty quick. I considered a lot of refinishing options, from using a countertop restoration kit, to building a new one out of planks, to covering the existing countertop in concrete. I also considered faux marble, which looks beautiful when done correctly, and pretty terribly when done poorly, and decided that my artistic skills were not quite up for it. I finally came across what looked like a pretty simple countertop painting and sealing technique on Designing Dawn. The technique basically involved sponge painting a variety of colors in layers (true artistic talent not required), and pouring on a thick sealant called Envirotex Lite. Her results looked pretty amazing, and she even had a follow up post showing how well it had held up over time (very well). I was sold.
The entire process started by taping off the area that would be painted, and draping everything the Envirotev could drip on in plastic so I wouldn’t have a giant mess to clean up later (since I am messy and couldn’t drape the entire room in plastic I still had a bit to clean up – it doesn’t come off of things easily). Then we sanded and primed the existing laminate countertop. We started with a general purpose primer which was a complete disaster (you can read more about here), but the second primer we used (Zinnser Bin) worked like a charm. For the record, my primer recommendation for this project is Zinnser Bin, but Primers should always be selected with the surface they are priming and the medium that will cover them in mind. I would also recommend sanding prior to taping, because the sanding dust gets caught in the tape. This wasn’t a problem for us since we had to re-tape everything anyway (see priming post). We also ended up removing the sink entirely even though we didn't originally intend to (again see the priming post). I would remove the sink from the start if I was doing this over again. The sink really isn't hard to remove (or put back on), and it makes the surface much easier to work on.

1st Disastrous Priming Attempt while the sink was still in place - Looking pretty sad

After the 2nd Primer Attempt and removal of the sink - Looking much Better
Next was the artistic painting which I was most nervous about. Once the primer was fully cured I laid down 3 coats of my base color, Benjamin Moore Simply White in Satin. I waited the recommended recoat time between coats, so this took a while.

Three Layers of of Base Color Applied.
Then it was time to let my inner artist free. I put a bit of each of my 3 paint colors in a plastic container and added a bit of water to thin them out. Then I dampened my sponges before dunking them in my thinned out paint.

Paint Colors Used to Create the Faux Stone Look. Clockwise from the upper left BM Moonshine, BM Simply White, and Grey Craft Paint.
To make my pattern I started with my darkest color and basically dabbed it all over the countertop using the kitchen sponge. Then I did the same with the medium paint, and the base color paint, letting some of the color that went before peek through each time. I didn’t let the paint dry between the colors so they ran together a bit, which I felt made it look even more natural.

The first of my 3 colors applied, and not looking super promising.
While the paint was still wet I sprinkled super fine glitter over the countertop to give the finished product a bit of depth, like real stone. I was pretty reluctant to bring glitter into my house because, as my sister’s friend says “Glitter is the Herpes of the craft world – once you get it you can’t get rid of it,” but it made the finished product look so good that it was worth it (even if I keep finding glitter around the house for the next 3 months). Then I let everything dry.

All three paint colors and glitter applied - starting to look pretty nice.
Confession time: The next morning after painting I decided that the left side of the countertop was too lite and I did a bit of touch up painting. This was a mistake. The newly applied paint just didn’t blend well with the previously applied paint. I should have left it the way it was, and now I regret touching it up. If you do this yourself reconsider touch up painting. Maybe wait a day or sleep on your touch up painting decision. If you do decide to do some touch up painting keep in mind that the newly applied paint probably won’t blend perfectly with the initially applied paint and make sure you are ok with that.
Ok, so everything is taped, draped in plastic, and artistically painted – now it is time for the magic sealing ingrediant - Envirotex Lite. Envirotex Lite is a two part reactive polymer compound (a resin and a hardener) that is mixed in two stages, then poured on top of whatever you are sealing. Basically you pour equal amounts of the resin and hardener in a mixing container, mix for the prescribed period of time, pour it into a new mixing container, and mix it again for the prescribed period of time, then pour it on whatever you are sealing and spread it out so that it covers the whole surface. We found some of the directions for this product kind of insane, but we followed them to the letter, including timing the mixing, switching containers, the whole nine yards, and we had absolutely no issues with the product hardening properly and found it relatively easy to apply, so at least they work.
To use the Envirotex Lite, you mix it up per the directions, pour it on, then spread it out (we used cheap plastic putty knives which we have been able to reuse). It was pretty easy to spread out with the putty knives, but it doesn't easily flow over the surface you are covering. It is more like moving corn syrup than water. You also have to work pretty fast because the mix starts setting up pretty fast, and once it starts to set you shouldn't move it any more (more on that below).

Amazingly Smooth Glassy Horizontal Surface actually reflecting!
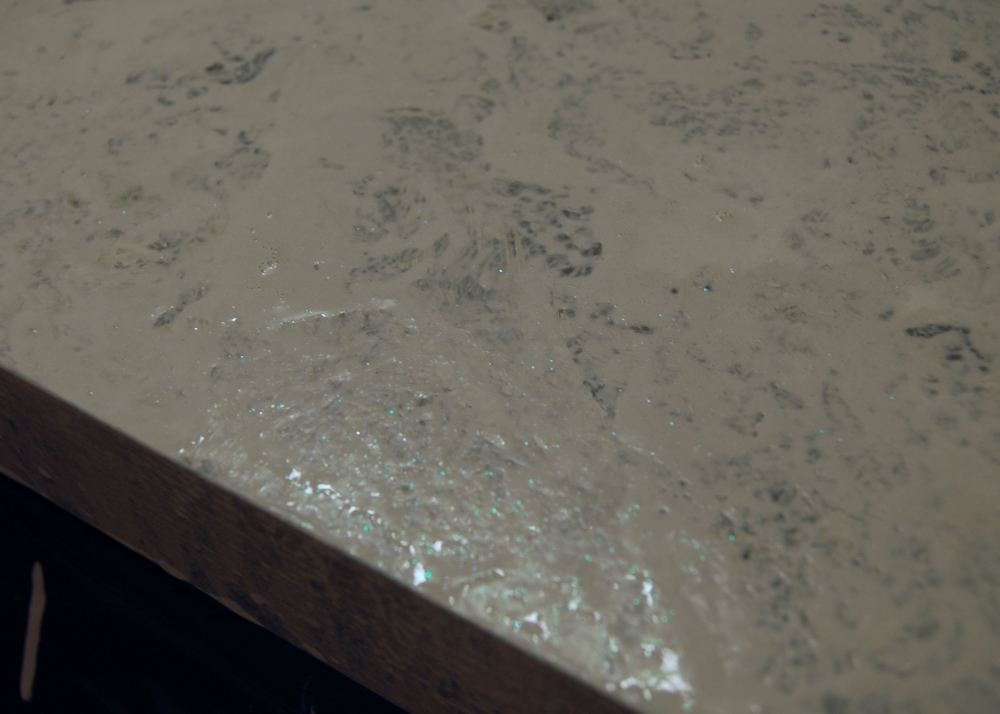
Since Envirotex lite is really made for horizontal surfaces, the vertical surfaces we needed to cover were a bit more of a challenge. When we poured the mix onto the countertop we poured a bit extra near the vertical surfaces then used our putty knives to lift and spread the mix onto the vertical surfaces like we were icing a cake with really thin sticky icing. The result was very well covered vertical surfaces, but unlike the perfectly smooth glassy horizontal surfaces the vertical surfaces are a bit textured. This really isn't a big deal. I had to try very hard to get this texture to show up in a picture as it is pretty hard to see. The pic below shows the texture in literally the worst possible light.

Vertical Surfaces are textured.
When the Envirotex starts to set up bubbles will form that need to be popped. According to the directions you can use a blow torch to pop the bubbles or blow on them. We got a blow torch for this purpose, but ended up just blowing on them and it worked fine on our relatively small application. If I were using the Envirotex on something larger I would go the blow torch route.
One thing that we learned while attempting to pop bubbles is that you should not touch them - AT ALL. This is what happens if you do;
Be warned - DON'T TOUCH THE BUBBLES or THIS will happen!
Our bubble touching mess was so bad that we ended up putting on a second coat of the Envirotex the next day right on top of the first. The second coat looks fantastic.

The Finished Countertop!
Want to know exactly what we used to make this happen? Here are the details;
- Paint:
- Primer: Zinnser Bin
- Base Color: Benjamin More Simply White
- Medium Grey: Benjamin Moore Moonshine (similar to, but slightly darker than our wall color)
- Dark Grey: Anita's All Purpose Acrylic Craft Paint in Grey
- Painting Supplies:
- Paint Brush- To Lay down the base coat and primer
- 3 Clean kitchen sponges – To Layer my paint colors (in retrospect natural sea sponges would have probably been easier to work with)
- 3 Disposable plastic containers to hold paint (something clean from the recycling bin works great)
- Water to thin the paint
- Painters Tape
- Plastic Tarps (we used cut up garbage bags)
- Finishing Touches:
- Tree House Studios Extra Fine glitter: Super small glitter used to add a bit of depth and sparkle like you see in real stone
- Sealing Supplies:
- 2 4 oz boxes of Envirotex Lite (we ending up doing 2 coats – 1 box per coat)
- 4 flat bottomed cylinder plastic containers (2 per coat for mixing the Envirotex)
- 4 wooden stiring sticks (2 per coat for mixing the Envirotex)
- Cheap Plastic putty knives (for spreading the Envirotex over the countertop)
- Hot Breath for popping bubbles
Let me know what you think, and if you would consider doing it yourself in the comments.
(This post contains affiliate links, but I was not paid to review or use any of the products mentioned.)


